This page may contain affiliate links. Click to learn more. As an Amazon Associate I earn from qualifying purchases.

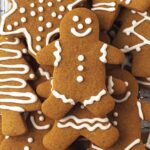
Easy cut-out vegan gluten-free gingerbread cookies that can be made either crisp or soft. They’re egg-free, dairy-free, and filled with the warm, classic gingerbread spices you associate with the holidays!
They can also be cut out into any shape and decorated exactly how you like them. Keep reading for all the details.

Save This Recipe!
In a hurry? Drop your email below, and this recipe will be sent straight to your inbox for later. You'll also get fresh recipes every week! You can unsubscribe anytime.
If you've been missing classic gingerbread cut-out cookies (or any of your other favourite cookies) since going vegan gluten-free, then I have great news for you!
There's no need to miss out any longer because this recipe for no-spread vegan gluten-free gingerbread cookies is a keeper and one you're going to want to make every holiday season.
They're the best because they're everything you want in a gingerbread cookie...they're filled with molasses and fragrant, warm spices to give that familiar spicy gingerbread flavour you associate with the holidays AND they can be made to be soft or crunchy.
As mentioned, these are rollout cookies, but if you're on the hunt for a soft and chewy gingerbread cookie recipe or a molasses cookie recipe, I've got recipes for those as well, just click those links to be brought straight to them.
And if you're looking for more vegan gluten-free holiday cookies, you'll like these:
- Sugar Cookies
- Thumbprint Cookies
- Thin Mint Cookies
- Chocolate Crinkle Cookies
- Coconut Macaroons
- Linzer Cookies
- Chewy Oatmeal Cranberry Chocolate Chip Cookies
Ready to make these gingerbread cookies? Keep reading for all of the details and my tips and tricks so you can make them perfectly every single time!
Ingredients You'll Need
The ingredients for this recipe are simple, there's nothing unusual to hold you back from making them!

Ingredient and Substitution Notes
I recommend making this recipe exactly as it’s written for the best and intended results, but you’ll find some ingredient notes below so you know what can and can’t be changed.
Gluten-Free Flour Blend – This recipe is made with gluten-free flour, Bob’s Red Mill Gluten-Free 1 to 1 Baking Flour to be specific, the one in the BLUE bag with xanthan gum (not the red bag!).
I have not tested with any other gluten-free flour other than this one, so I’m not sure how others would work. With vegan gluten-free baking, it’s always important to use the same flour the recipe calls for to get the expected results.
This recipe will not work with any single gluten-free flour, such as coconut, rice, etc. It must be the blend mentioned above, for the best and intended results, use the flour the recipe calls for.
Make sure to measure your flour correctly or your cookies will not have the correct texture.
Vegan Butter – I have not made this recipe with coconut oil or any other type of oil, so I cannot comment on what the results would be like, I would stick with vegan butter for this recipe. I haven't tried making this recipe oil-free. Use vegan butter that comes in sticks, not vegan margarine that comes in a container (it's too soft).
Molasses – For this recipe, you need to use molasses labelled "fancy," “unsulphured,” “dark,” OR “baking.” Avoid using blackstrap molasses since its flavour is so strong and it can be bitter. Don't leave the molasses out or try to substitute it with something else since it contributes to the gingerbread flavour. Molasses is naturally gluten-free but check the label for any chance of cross-contamination.
Brown Sugar – I use dark brown sugar in this recipe but you can use regular brown sugar or coconut sugar instead. Not all sugar is vegan, some are processed using animal bone char, so to be sure that yours is, buy an organic brand (organic sugar is not processed using bone char) or look for one that is labelled as vegan. Powdered sugar, turbinado sugar, and liquid sugar (like maple syrup or agave) will NOT work in this recipe. I have not tested with any sugar alternatives.
Cornstarch – Since these gingerbread cookies contain no egg and are made without flax eggs, this is the ingredient that's replacing the binding properties of an egg. I’ve tested this recipe with both cornstarch and arrowroot starch and both results were the same, so use the one you have on hand.
Spices - This blend of spices (along with the molasses) is essential to getting that classic gingerbread flavour. The measurements are perfectly balanced, so don't omit, reduce, or increase any of them.
Are you new to vegan gluten-free baking? If so, be sure to read all of my vegan gluten-free baking tips!
How to Make Them
(Note: I’ve outlined the step-by-step on how to make this recipe here, but find the full recipe, ingredients, and directions at the end of this post.)
While reading the simplified steps, follow along with the numbered images below!
1. Mix all of the dry ingredients together and set them aside.
2. Next, using an electric hand mixer (or a stand mixer), cream the butter and brown sugar together until it’s light and fluffy, this will take about 2-3 minutes. Add the molasses and blend again until everything has combined.
3. Gradually add the flour mixture to the butter mixture and mix. If you are using an electric hand mixer, switch over to mixing with a wooden spoon at this point.
4. Continue mixing until everything has combined and you’re able to form the dough into a ball.

5. (NOT PICTURED) Place the ball of dough onto a piece of plastic wrap, flatten it into a thick disk, wrap it tightly, and place it in the refrigerator for at least three hours and up to three days. Chilling allows the dough to firm up so it can be rolled easily.
6. After the dough has chilled, remove it from the refrigerator, unwrap it, and place the dough on a large piece of parchment paper. Place another piece of parchment paper on top and using a rolling pin, roll until the dough is ¼ of an inch thick. The cut-outs need to be ¼ of an inch thick so they end up with the proper texture and for them to hold up nicely when decorating.
7. Cut the dough into shapes, getting your shapes as close as possible to each other. It’s important for the cut-outs to be ¼ of an inch thick so the cookies are soft (if you are going for soft cookies) and for them to be able to hold up nicely when decorating.
TIP: If the dough gets too warm at any point while rolling and it starts to stick to the parchment paper, refrigerate it for about 15 minutes so it cools back down.
8. Once done, use a spatula to transfer them to your baking sheet, then gather up the dough scraps, form them into a ball, and repeat the rolling and cutting process.
9. The next step is to bake them. Once they’ve finished baking, let them sit on the baking sheet for a minute or two and then transfer them to a cooling rack so they can fully cool before decorating (or eating!).

Soft? Or Crisp?
These cookies can be made to be either soft or crispy with a snap, it all depends on what you prefer.
I tested the baking time, multiple times, and have provided two different time ranges in the recipe below so you end up with the cookie texture you prefer.
If you are going for a crunchy cookie, they will still seem soft when they come out of the oven and as they are cooling, but they will slowly firm up as they cool.
Cut Into Any Shape
Don't think that gingerbread can only be cut out into gingerbread man and gingerbread people shapes! You can use any type of cookie cutter you like.
Snowflakes, Christmas trees, stars, reindeer, snowmen, candy canes, bells, circles, squares...like I said, any shape you like!

How to Decorate Them
Decorating your gingerbread cookies isn't necessary, they can be enjoyed unfrosted, but it's fun to do and makes them look a little extra festive and unique. It's also a fun kid-friendly activity for the holidays, make some cookies, make some icing, invite some of their friends, and let them decorate!
In the recipe below, I've provided recipes for a quick vegan icing for gingerbread cookies that can also be used as a glaze, and one for my vegan royal icing, if you choose to decorate.
Both of them can have colour added to them and you can create simple or intricate designs. It's all up to you!
You can also use buttercream frosting to decorate them if you'd like, I recommend my vegan buttercream frosting for that.
You can use my cookies as inspiration for your decorating, but if you're looking for fancier, more intricate designs, or if you are just starting and you want to learn how to decorate them, you can find lots of inspiration on Pinterest and YouTube.
Here is a YouTube video showing how to make pretty decorated gingerbread snowflakes.
TIP: If you’re new to cookie decorating, I highly recommend this inexpensive cookie decorating kit (Amazon Link) that comes with four of the most popular cookie decorating tips as well as eight disposable decorating bags.
Decorating Tools
If you don’t have any tools, you can use a spoon for decorating cookies, but there are also some tools you can purchase to make it easier. I recommend the following:
Cookie Decorating Kit – This 12-piece kit is perfect for beginners, it contains four different tips for cookie decorating as well as 8 disposable piping bags.
Frosting Bottles – These are great for kids to use and they take away the need for piping bags. Each bottle comes with one piping tip.
Cookie Decorating Tips – If you already have piping bags and you just need tips, this is a good set to have.
Piping Bags – You can use disposable piping bags but to avoid waste, you can also build up a collection of reusable piping bags over time as I have done.
For homemade piping bags, you can:
- Make small piping bag cornets out of parchment paper.
- Use small Ziplock bags by spooning the icing into the bag, closing it, and snipping a very small piece off of the corner.

Making Ahead
The dough can be made and kept in the refrigerator for up to 3 days or in the freezer for up to 2 months. Make sure to wrap the dough tightly in plastic wrap and then place the wrapped dough in an airtight container or a freezer bag before refrigerating or freezing.
If you freeze the dough, thaw it in the fridge the night before you will be using it.
Whether your dough was refrigerated for longer than a day or previously frozen, let it sit at room temperature for about 15 minutes before rolling out.
Storing and Freezing
Store cookies in an airtight container, where they will stay fresh for up to 7 days. If you have decorated your cookies, make sure you have given the icing enough time to fully dry before stacking and storing to avoid messing up your designs.
Be aware that depending on how much icing you have put on your cookies (usually when you pile it on really thick!), it can take up to 8 hours to fully dry.
If you've just made simple, thin designs (like the cookies in my pictures), the icing should fully dry in roughly 2-3 hours.
Freeze cookies, decorated or undecorated, in single layers, separated by parchment paper in a freezer bag or in an airtight container where they will keep for up to 2 months. Thaw in the refrigerator or on the counter when you’re ready to serve.
Once thawed, you can go ahead and decorate.

Tips for Success
- Use the same flour I use. Baking vegan gluten-free can be tricky because different flours produce different results. I know this particular flour works perfectly for this recipe, so to duplicate that perfection, please use Bob’s Red Mill Gluten-Free 1 to 1 Baking Flour (in the BLUE bag!).
- Measure your flour correctly. Too much flour in this recipe will make your dough too dry, crumbly, and it won't stick together. Please read my article about how to measure flour correctly.
- Measure and have all your ingredients ready to go before starting. This will make the process run smoothly, quickly, and easily.
- Make sure that your butter is slightly softened before starting, NOT melted or TOO soft. To make sure your butter is at the ideal softness, lightly press your finger into it. If it leaves a shallow indent, your butter is at the perfect temperature. If your finger sinks into the butter with barely any effort, your butter is too soft. Refrigerate it until it has firmed up and then test it again.
- Don’t skip chilling the cookie dough. This step is VERY important for the cookies to turn out properly. If the dough is not chilled, it will be hard to roll out since it’s a sticky dough before it has been chilled. Chilling also allows the dough to hydrate which helps the final texture.
- Test bake a few cookies before baking the whole batch. To be sure you end up with cookies that are just the way you like, bake a few test cookies first and allow them to fully cool to figure out the baking time that works best for you. All ovens are different, so baking times will be different, depending on the size of your cookie cutters and whether you want soft or crunchy cookies. Start with the ranges I provide in the recipe and adjust as necessary.

Tips for Success (continued)
- Bake large and small cookies separately. You can use different-sized and shaped cookie cutters, but make sure to bake very small cookies separate from larger cookies because they will have different baking times. Keep similar-sized cookies on the same baking sheets so they can be pulled out at the same time.
- Don’t overbake them. These cookies overbake easily, so make sure to set your timer and remove them from the oven right away. If over-baked, your cookies will be too hard (still delicious, though!).
- Make sure to fully cool your cookies before decorating them. If you don’t, the icing will drip right off the cookies and make a mess.
- Take note of the chilling time before starting. The dough must be chilled for at least 3 hours before rolling out, so give yourself enough time. The dough can be made the day before, if needed. Info about doing that is above in the "Making Ahead" section and below in the recipe notes.
- Read this post from top to bottom before you start. I’ve included a lot of tips and tricks so you get things right. Also, read through the actual recipe before getting started.
- Follow the recipe exactly as it’s written for the very best results.

See? No one has to miss out on any occasion, especially during the holidays. Yes, these cookies are vegan and gf, but they taste just as good as their classic counterparts...maybe even better!
(And if you want to share, they make a great edible gift to make and give!)
If You Make This Recipe...
Tell me about it by leaving a comment and rating below! You can also share a picture on Instagram and tag me so I can see it, I’m @delightfuladventures over there. I can't wait to see your remakes and if you decorated them, your designs!
And If You Like This Recipe...
You may like these other gingerbread-flavoured recipes:
- Gingerbread Cake
- Gingerbread Muffins
- Gingerbread Loaf
- Gingerbread Pancakes
- Gingerbread Waffles
- Gingerbread Latte
Vegan Gluten-Free Gingerbread Cookies
Suggested Equipment:
Ingredients:
- 2 ½ cups (370g) gluten free flour **see important note about flour below**
- 1 tablespoon cornstarch or arrowroot starch
- 1 teaspoon ground cinnamon
- 1 teaspoon ground ginger
- ½ teaspoon ground cloves
- ½ teaspoon ground nutmeg
- ½ teaspoon baking soda
- ¼ teaspoon salt
- ½ cup / 1 stick (113g) unsalted vegan butter, (slightly softened, see note below)
- ⅓ cup (67g) dark brown sugar
- ½ cup (120ml) molasses (see note below)
Quick Icing (Optional)
- 1 cup (120g) powdered sugar
- 1 tablespoon unsweetened dairy-free milk
- ⅛ teaspoon vanilla extract
Royal Icing (Optional)
- 1 batch vegan royal icing
Instructions:
- In a medium bowl, add the gluten-free flour, cornstarch, ground cinnamon, ground ginger, ground cloves, ground nutmeg, baking soda, and salt. Whisk to combine and set aside.
- In a large bowl, using an electric mixer, beat the vegan butter and dark brown sugar until blended and creamy, about 3 minutes. Stop to scrape down the sides of your bowl when needed. Add molasses, blend again until combined.
- Gradually add the flour mixture to the butter mixture and mix with a wooden spoon until a soft, sticky dough has formed. Form the dough into a ball.
- Place the dough ball on a piece of plastic wrap and pat down into a disk. Wrap the dough disk and place in the refrigerator to chill for at least 3 hours.
- Remove from the fridge and let it sit at room temperature for a few minutes (it may be too hard to roll out right away, especially if it has been in the fridge for longer than 3 hours).
- Preheat oven to 350°F (177°C).
- Line cookie sheet(s) with parchment paper.
- Dust a piece of parchment paper with a little gluten free flour and place the chilled dough on top of the flour. Place another piece of parchment paper on top of the dough and using a rolling pin, roll dough out until it is ¼-inch thick.
- Cut out shapes and place them on the prepared baking sheets, leaving at least 1-inch of space between the cookies.
- Gather dough scraps and repeat rolling and cutting until all of the dough has been used.
- Bake cookies. For softer cookies, bake for 8-9 minutes, for crunchy cookies, bake for 10-11 minutes.
- Remove from oven and let cookies cool on the cookie sheet for 1-2 minutes before transferring them to a cooling rack. Fully cool before decorating.
To Make Quick Icing (Optional)
- Add all icing ingredients to a small bowl and mix together until smooth. If the icing is too thick, add more milk, ¼ teaspoon at a time.
- Fill a piping bag with the icing and using a small tip, decorate cookies.
To Make Royal Icing (Optional)
- Follow the steps in my Vegan Royal Icing recipe.
Recipe Notes:
- Please read all of the information above and below before making this recipe.
- The gingerbread man cookie cutter I have is 2.5" wide by 3" tall and I get 30 cookies when I use it. The recipe will make slightly more cookies, or slightly less if you use a smaller or larger cookie cutter than I do.
- This recipe can be doubled if needed. If doubling, separate the dough into two equal pieces and wrap them separately before chilling.
- It’s important to know that different gluten-free flour blends use different ingredients and ratios, so results may vary if you substitute. I have never used any other brand of gf flour to make this recipe other than Bob’s Red Mill Gluten Free 1 to 1 Baking Flour (Amazon link) in the blue package with xanthan gum, NOT the red package, so please know that your results may not be the same as mine if you substitute with another gluten-free flour blend. The weight listed above is for this specific brand of flour.
- This recipe will NOT work with coconut flour or any other single gluten-free flour, it must be a blend, the one listed above for the intended and best results.
- Powdered sugar, turbinado sugar, and liquid sugar (like maple syrup or agave) will NOT work in this recipe. I have not tested with any sugar alternatives.
- Measure your flour correctly.
- Make sure that your butter is slightly softened before starting, NOT melted or TOO soft. To ensure your butter is at the ideal softness, lightly press your finger into it. If it leaves a shallow indent, your butter is at the perfect temperature. If your finger sinks into the butter with barely any effort, your butter is too soft. Refrigerate it until it has firmed up and then test it again.
- Use molasses labelled "fancy," “unsulphured,” “dark,” or “baking.” Avoid using blackstrap molasses in this recipe since its flavour is so strong and can be bitter.
- If your cookie dough gets too warm while rolling and cutting, place it back in the refrigerator to cool down for about 15 minutes.
- In order to end up with cookies that are just the way you like, bake a few test cookies first and allow them to fully cool so you can figure out the baking time that works best for you. All ovens are different, so baking times will be different, depending on the size of your cookie cutters and whether you want soft or crunchy cookies. Start with the ranges I provide in the recipe and adjust as necessary.
- If you're using smaller cookie cutters, those cookies will require less baking time than larger cookies. Keep similar-sized cookies on the same baking sheets so they can be pulled out at the same time.
- Icing is not necessary if you don't want to decorate your cookies, but if you do choose to decorate them, 2 icing recipes are provided: a quick icing and royal icing (but only one is necessary, the choice of which one is up to you).
- Store leftovers in an airtight container in a cool, dry spot for up to 7 days.
- Freezing Baked Cookies: Freeze cookies in single layers in a freezer bag or airtight container, with parchment paper separating each layer, for up to 2 months. Thaw in the refrigerator or at room temperature and when you’re ready to serve, just place them on a plate and bring them to room temperature.
- To freeze the cookie dough for baking later: Wrap the cookie dough tightly and place it in an airtight freezer-safe bag or container and freeze for up to 2 months. When you’re ready to bake them, remove from the freezer and thaw overnight in the refrigerator. When ready, start back at step 5. If the dough is a little hard to roll out, let it sit at room temperature for 10 minutes.
- The dough can be made in advance and kept in the refrigerator, tightly wrapped, for up to 3 days. When you are ready to make your cookies, remove the dough from the fridge and let it sit at room temperature for about 15 minutes before rolling out.
- Nutrition info is based on 1 of 30 cookies cut ¼" thick without any type of decoration or sprinkles and using the recipe as it is written. This info and is only to be used as a rough guide. Click to learn how nutrition info is calculated on this website.
Belinda says
I want to say that this was a perfect recipe for the holidays!! They were flavourful and a big hit with all the family! This will be a Christmas staple moving forward. I just need to work on the baking time as I could not get them as soft as I wanted to.
Gwen Leron says
Hi Belinda! I'm so glad you enjoyed them! Thanks for your review. And yes, play with the times a bit if you want them soft, every oven is slightly different. Take a minute off to start and then adjust from there.
Kim says
My dough came out a bit dry and I’m having trouble keeping it in a ball to refrigerate. Any tips on how to fix the moisture?
Gwen Leron says
Hi Kim, I would add a little water, maybe a teaspoon at a time and knead it until it comes together and looks like the dough in the pictures. I hope this helps! Anything else, please ask.
Makenna says
This is my first time ever making gingerbread cookies and this had a recipes that was super easy to follow! Also I loved having those notes to help guide me❤️ the cookies turned out great and I really enjoyed this recipe!!
Gwen Leron says
Thanks you so much for coming back to leave your comment, Makenna! I am so happy to know you like the cookies and that you found all of my tips helpful, I really appreciate you saying that. Enjoy the cookies!
Nancy Holthus says
The best gingerbread cookies I ever made! Thank you
Gwen Leron says
You're welcome, Nancy! I'm glad you love them!