This page may contain affiliate links. Click to learn more. As an Amazon Associate I earn from qualifying purchases.

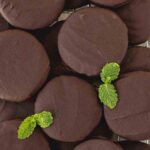
Crisp, melt-in-your-mouth vegan thin mint cookies that also happen to be gluten-free! They’re the classic crispy cookies you know and love except these are homemade with just a few simple ingredients and you can make them any time of year.
They’re coated with cool, creamy, minty chocolate and they’re also dairy-free and egg-free. These special treats are sure to become a favourite you'll be making over and over again!

Save This Recipe!
In a hurry? Drop your email below, and this recipe will be sent straight to your inbox for later. You'll also get fresh recipes every week! You can unsubscribe anytime.
If you've been following me for a while, you know that it's chocolate mint day here! If you're new, I always share a chocolate mint recipe to celebrate my website's anniversary.
This year, to celebrate SEVEN years, I'm sharing these amazing homemade vegan gluten-free thin mint cookies with you.
In the past, I've shared the following celebration recipes; you should check them out if you love chocolate mint as much as I do:
- Chocolate Peppermint Cupcakes
- Peppermint Bark
- Dark Chocolate Mint Truffles
- Chocolate Mint Doughnuts
- Vegan Peppermint Patties
- Vegan Peppermint Mocha
- Easy Vegan Fudge (3 Ingredients!)
- Vegan Chocolate Peppermint Cookies
- Vegan Chocolate Mint Cake
These cookies are a huge favourite in my home, I hope you love them, too!
What are Thin Mint Cookies?
They're a thin, crisp, chocolate wafer-like cookie coated in cool minty chocolate made popular by the Girl Scouts / Girl Guides.
This recipe is a copycat version of those popular Girl Scout cookies, the current American version. Here in Canada, they're called Girl Guides, but it seems that they've changed their thin mints from how I remember them (I haven't had them in well over a decade!).
The images I see online show that along with the crisp cookie and chocolate coating, there is now also a creamy mint filling inside and they're called "Chocolatey Mint Cookies." So these aren't a copycat of the current Canadian version, it's a throwback to what they used to be, how I remember them.
Did you know that the American version of mint thins is vegan? BUT, they are not gluten-free, so if you've been missing those minty little cookies, this is a recipe you need to make. (The Canadian chocolate mint cookies are NOT vegan or gf.)
Ingredients You'll Need
There are no hard-to-find or strange ingredients in this recipe, so hopefully, you have all of them in your kitchen right now so you can make your own thin mints today!
There are two groups of ingredients for this recipe, the cookies and the chocolate coating. These are the ingredients you'll need for the cookies, the coating is discussed in detail lower down in the post.

Ingredient and Substitution Notes
As always, I recommend making this recipe exactly as it’s written for the best and intended results, but you’ll find some ingredient notes below so you know what can and can’t be changed.
Gluten-Free Flour Blend – This recipe calls for Bob’s Red Mill Gluten-Free 1 to 1 Baking Flour, the one in the BLUE bag with xanthan gum.
I have not tested with any other gluten-free flour other than this one, so I’m not sure how others would work. With gluten-free baking, it’s always important to use the same flour the recipe calls for to get the expected results.
This recipe will not work with any single gluten-free flour, such as coconut, rice, etc. It must be the blend mentioned above, so for the best and intended results, use the flour the recipe calls for.
Make sure to measure your flour correctly or your cookies will not have the correct texture.
Cocoa Powder – I use high-quality Dutch-process cocoa powder for these cookies. Make sure you sift it before adding it to your recipe to get all the lumps out.
Sugar – I use organic cane sugar but white granulated sugar will work, too. I have not tried this recipe with any sugar alternatives or liquid sweeteners.
Not all sugar is vegan, some are processed using animal bone char, so to be sure that yours is, buy an organic brand (organic sugar is not processed using bone char) or one that is labelled as vegan.
Flax Egg – Since this is an egg-free recipe, a flax egg is used as a replacement. If you cannot have flax, you can use a chia egg in its place, use the same measurements listed in the recipe to make a chia egg.
Vegan Butter – I have not made this recipe with coconut oil or vegetable oil, so I cannot comment on what the results would be like, so I would stick with vegan butter for this recipe. I have not tried making this recipe oil-free.
Peppermint Extract - Make sure you are using peppermint extract and NOT mint or spearmint extract, they do not have the same flavour. Food-grade peppermint oil can be used as a substitute but it is much stronger than extract, see the recipe notes for info on how much to use.
How to Make Them
(Note: I’ve outlined the step-by-step on how to make this recipe here, but find the full recipe, ingredients, and directions at the end of this post.)
While reading the simplified steps, follow along with the numbered images below!
Start by making your flax egg and setting it aside so it can thicken.
1. Mix all of the dry ingredients together and set them aside.
2. Next, using an electric hand mixer, cream the butter and sugar together until it’s light and fluffy, this will take about 2-3 minutes. Add the flax egg and peppermint extract, blend again until everything has combined.
3. Gradually add the flour mixture to the butter mixture and mix. I switch over to mixing with a wooden spoon at this point.
4. Continue mixing until everything has combined and you’re able to form a ball with the dough.

The dough will be very soft and sticky, and you may think that something is wrong with it, this is how it’s supposed to be, so no need to worry!
Place the dough on a piece of plastic wrap, flatten the dough into a thick disk, wrap tightly, and place in the refrigerator for at least three hours and up to two days.
After the dough has chilled, remove it from the refrigerator, unwrap and place the dough on a large piece of parchment paper. Place another piece of parchment paper on top and using a rolling pin, roll until the dough is ¼ of an inch thick.
Using a 2-inch cookie cutter, cut the cookies out. Once done, use a spatula to transfer them to a parchment-lined cookie sheet, then gather up the dough scraps, form them into a ball and repeat the rolling and cutting process.
TIP: If you don't have a 2-inch cookie cutter, you can use a small cup or glass to cut the cookies out. The closer you can get to 2-inches, the better.
If the dough gets too warm at any point and it’s starting to stick to the parchment paper, refrigerate it for about 15-20 minutes so it chills and firms up again.
The cut-outs need to be ¼ of an inch thick, if they are rolled too thin, they will not remain flat and will warp as they bake. ¼ of an inch may seem a little too thick and thicker than the originals, but it's the perfect thickness for the homemade version, you'll see!
Once all the cookies have been cut out, bake them. They will seem a little soft when they come out of the oven, but they will firm up and become crisp as they cool and have a snap when you bite into them.

After the cookies have baked, remove them from the oven, let them sit on the cookie sheet for a minute or two and then carefully place them on a cooling rack. While the cookies are cooling, prepare the chocolate coating.
Alternative to Rolling and Cutting the Dough
If you don't like rolling and cutting out cookie dough, or if you don't have a 2-inch cookie cutter, I have another method for you: the slice and bake method. I tested this recipe both ways, I prefer the roll and cut-out way, if you don't, try this.
After you make the dough, roll it into a 2-inch diameter round log and wrap tightly in plastic wrap. Chill in the fridge for at least 3 hours. When the chilling time is up, remove the log from the refrigerator, slice it into quarter-inch slices, and bake.
Are you new to vegan gluten-free baking? If so, be sure to read all of my vegan gluten-free baking tips!
Make the Chocolate Coating
You'll need three ingredients for this step: chopped chocolate, coconut oil, and peppermint extract.
Chocolate Coating Ingredient and Substitution Notes
Chocolate - I use plain semi-sweet chocolate (NOT unsweetened) and I use a large bar. Make sure the type you buy is vegan.
Chocolate chips can be used, but since they contain stabilizers to help them keep their shape, they're not ideal for melting and dipping because the melted chips will be thicker. It WILL work, but it will just be a little more difficult to work with, so keep that in mind.
I chop the chocolate bar up into small pieces, as shown below, and then I melt it. More info on melting the chocolate is below.
Coconut Oil - A little coconut oil is added to the chocolate the help thin it out and make the dipping process easier and since your peppermint extract is likely alcohol-based, the oil is also needed to prevent the chocolate from seizing when the extract is added. If you don't have coconut oil, any neutral flavoured oil can be used in its place.
Peppermint Extract - Make sure you're using peppermint extract and NOT mint or spearmint extract, they do not have the same flavour. Use one that does not have water in the ingredient list, if water is added to melted chocolate, it will seize. Food grade peppermint oil can be used as a substitute but it is much stronger than extract, see the recipe notes for info on how much to use.

Melting the Chocolate
You have two choices when it comes to melting the chocolate: the double boiler method or the microwave.
The Microwave Method
If you will be using the microwave, your chocolate needs to be melted in intervals, not all at once or it will harden.
Put the chopped chocolate in a microwavable glass bowl. Melt at 20-second intervals, stirring after each interval has ended. Stop the intervals when almost all the chocolate has been melted and stir until there are no pieces left.
Add the peppermint extract to the mixture and stir.
The Double Boiler Method
Add about 2-inches of water into a pot and over medium heat, bring the water to a simmer. Put the chopped chocolate and coconut oil into a heat-proof glass bowl that is large enough to sit on the top of the pot without the bottom of the bowl touching the water.
When the water is simmering, place the bowl over the top of the pot. Take care that no water or steam gets into the bowl of chocolate or the chocolate will seize.
Once the chocolate has started to melt, stir it occasionally and when it's almost all melted, carefully remove the bowl from the pot and stir until all the chocolate has melted.
Add the peppermint extract to the mixture and stir.

Dipping the Cookies
When the cookies have fully cooled, and they must be fully cooled before dipping, place each cookie, one at a time, into the bowl of chocolate and using a fork, flip the cookie over so both sides get coated.
Remove the cookie from the chocolate with the fork and place it on a parchment-lined cookie sheet for it to set. You can use a toothpick or another fork to help get the cookie off of the fork if needed. Repeat with the rest of the cookies.
Cookies should be set at room temperature after about 30-minutes, or you can speed things up by placing the cookie sheet in the refrigerator or the freezer. (Cold thin mints are THE BEST!)

Storing and Freezing
Storing at Room Temperature: Store cookies in an airtight container, where they will keep for up to 5 days. If there are still leftovers after 5 days, place the container in the refrigerator for another 7 days.
Storing in the Refrigerator: Store cookies in an airtight container, they will keep in the refrigerator for roughly 2 weeks.
Storing in the Freezer: Freeze the cookies in single layers in a freezer bag or in an airtight container where they will keep for up to 2 months. Thaw in the refrigerator or on the counter when you’re ready to serve.
Serving Cold
In my opinion, thin mints are BEST when they are enjoyed cold. So I always store mine in the fridge. While testing this recipe, I had so many at one point, I had to freeze some and learned that they are equally as good straight from the freezer.
Making Ahead
The dough can be made and kept in the refrigerator for up to 2 days or in the freezer for up to 2 months. Make sure to wrap the dough tightly in plastic wrap and then place the wrapped dough in an airtight container or a freezer bag before refrigerating or freezing.
If you freeze the dough, thaw it in the fridge the night before you will be using it.
Whether your dough was refrigerated for longer than a day or previously frozen, let it sit at room temperature for about 15 minutes before rolling out.

Tips for Success
- Use the same flour I use. Baking vegan gluten-free can be tricky because different flours produce different results. I know this particular flour works perfectly for this recipe, so to duplicate that perfection, please use Bob’s Red Mill Gluten-Free 1 to 1 Baking Flour (in the BLUE bag!).
- Measure your flour correctly. Too much flour in this recipe will make your dough too dry and very crumbly. Please read my article about how to measure flour correctly.
- Measure and have all your ingredients ready to go before starting. This will make the process run smoothly, quickly, and easily. Make sure all of your ingredients are at room temperature.
- Make sure that your butter is slightly softened before starting, NOT melted or TOO soft. To make sure your butter is at the ideal softness, lightly press your finger into it. If it leaves a shallow indent, your butter is at the perfect temperature. If your finger sinks into the butter with barely any effort, your butter is too soft. Refrigerate it until it has firmed up and then test it again.
- Don’t skip chilling the cookie dough. This step is VERY important for the cookies to turn out properly. If the dough is not chilled, it will be hard to roll out since it's a sticky dough before it has been chilled.
- Make sure to fully cool your gluten-free chocolate mint cookies before dipping. If you don’t, the chocolate will not hold on to the cookie and you will end up with a mess.
- Read this post from top to bottom before you start. I’ve included a lot of tips and tricks so you get things right. Also read through the actual recipe before getting started.
- Follow the recipe exactly as it’s written for the very best results.
Are you new to vegan gluten-free baking? If so, be sure to read all of my vegan gluten-free baking tips!
If You Make This Recipe...
Tell me about it by leaving a comment and rating below! You can also share a picture on Instagram and tag me so I can see it, I’m @delightfuladventures over there.
And If You Like This Recipe...
You may also like these other vegan gluten-free chocolate recipes:
Vegan Thin Mint Cookies (Gluten-Free, Dairy-Free)
Suggested Equipment:
Ingredients:
Cookies
- 1 ½ teaspoons ground flax seeds
- 4 ½ teaspoons water
- ⅔ cup (98g) gluten free flour blend **see important note about flour below**
- ¼ cup (21g) Dutch-process cocoa powder
- ⅛ teaspoon salt
- ¼ cup (½ stick / 57g) unsalted vegan butter softened
- ⅓ cup (67g) granulated sugar
- ½ teaspoon peppermint extract (see note below)
Chocolate Coating
- 250g (9oz) semi-sweet chopped chocolate (or 1 ½ cups (270g) semi-sweet chocolate chips, see note below)
- ½ teaspoon coconut oil
- ¼ teaspoon peppermint extract (see note below)
Instructions:
Make the Cookies:
- Prepare your flax egg by whisking together ground flax seeds and water. Set aside to thicken.
- In a large bowl, add the gluten-free flour, cocoa powder, and salt. Whisk well to combine and set aside.
- In a medium bowl, using an electric mixer, beat the butter and granulated sugar together until blended and creamy, about 3 minutes. Stop to scrape down the sides of your bowl when needed. Add flax egg and peppermint extract, blend again for 1 minute.
- Gradually add the flour mixture to the butter mixture and mix on low speed with your electric mixer or with a wooden spoon until a soft, sticky dough has formed. Form the dough into a ball.
- Place the dough ball onto a piece of plastic wrap and pat down into a thick disk. Wrap the dough disk and place it in the refrigerator to chill for at least 3 hours.
- After the chill time has passed, remove the dough from the fridge and let it sit at room temperature for a few minutes.
- Preheat oven to 350°F (177°C).
- Line cookie sheet(s) with parchment paper (if needed), set aside.
- Dust a piece of parchment paper with a little gluten-free flour and place the chilled dough on top of the flour. Place another piece of parchment paper on top of the dough and using a rolling pin, roll the dough out until it is ¼-inch thick.
- Using a 2-inch cookie cutter, cut out the cookies and place them on the prepared baking sheets, leaving at least 1-inch of space between the cookies.
- Gather dough scraps and repeat rolling and cutting until all of the dough has been used.
- Bake cookies for 11 minutes.
- Remove from the oven and let cookies cool on the cookie sheet for 2 minutes before transferring them to a cooling rack. They will still be very soft right after they come out of the oven, but that's okay, they will harden as they cool. Cool completely before dipping in chocolate.
Make the Chocolate Coating:
- Line another cookie sheet with parchment paper, set aside.
- Place chopped chocolate and coconut oil in a glass bowl and melt in the microwave in 20-second intervals. Stir after each interval. Once the chocolate has melted, stir well to make sure oil and chocolate have combined and the mixture is smooth.
- Add peppermint extract and stir.
- Add each cookie, one at a time, to the bowl of melted chocolate. Using a fork, turn each cookie to coat both sides, then lift the cookie out of the chocolate with the fork and gently tap the fork on the side of the bowl to get rid of any excess chocolate.
- Place each cookie on your prepared cookie sheet. Repeat until all cookies have been coated.
- Allow the cookies to sit at room temperature for about 30-minutes or until the chocolate sets. To speed up this process, you can place the cookie sheet in the fridge (or freezer) until they set (about 10 minutes). (These cookies are excellent served cold!)
Recipe Notes:
- Please read all of the information above, as well as the notes below before making this recipe.
- This recipe makes 20 cookies, which is the amount you’ll get if you use a 2-inch round cookie cutter.
- It’s important to know that different gluten-free flour blends use different ingredients and ratios, so results may vary if you substitute. I have never used any other brand of gf flour to make this recipe other than Bob’s Red Mill Gluten Free 1 to 1 Baking Flour (Amazon link) in the blue package, NOT the red package, so please know that your results may not be the same as mine if you substitute with another gluten-free flour blend. The weight listed above is for this specific brand and type of flour.
- This recipe will NOT work with coconut flour or any other single gluten-free flour, it must be a blend, preferably the one I mentioned above for the best results.
- Make sure to measure your flour correctly.
- If you cannot have flax, you can use a chia egg in its place, use the same measurements listed in the recipe to make a chia egg.
- Be sure you are using peppermint extract and NOT mint or spearmint extract. They have different flavours, peppermint is best for this recipe to achieve the proper flavour. Make sure that the extract does not contain water in the ingredient list.
- Food-grade peppermint oil may be used instead of peppermint extract. Since peppermint oil is stronger than extract, the rule is to divide the amount of extract called for by four. So for this recipe, you'll need to use just ⅛ teaspoon of peppermint oil for the cookies and 1/16th of a teaspoon for the chocolate coating. This is just a general rule, though, so after adding the peppermint oil, taste the dough and the coating, and if you feel it needs a bit more peppermint flavour, add another drop (or two).
- Use semi-sweet chocolate, NOT unsweetened chocolate for the coating.
- Chocolate chips can be used for the chocolate coating, but since they contain stabilizers to help them keep their shape, they're not ideal for melting and dipping because the melted chips will be thicker. It WILL work, but it will just be a little more difficult to work with, so keep that in mind.
- A microwave is used to melt the chocolate in the recipe, but you can also use the double boiler method, read how to do that in the post above.
- Storing at Room Temperature: Store cookies in an airtight container, where they will keep for up to 5 days. If there are still leftovers after 5 days, place the container in the refrigerator for another 7 days.
- Storing in the Refrigerator: Cold thin mints are amazing, so I recommend storing them this way. Store cookies in an airtight container, they will keep in the refrigerator for roughly 2 weeks.
- Storing in the Freezer: Freeze the cookies in single layers in a freezer bag or in an airtight container where they will keep for up to 2 months. Thaw in the refrigerator or on the counter when you’re ready to serve.
- Nutrition info is based on 1 of 20 cookies with the recipe made as written and is only to be used as a rough guide. Click to learn how nutrition info is calculated on this website.


Gabriella says
These taste So good!
Gwen Leron says
Thank you so much, Gabriella! I'm so happy to know you like them!
Donna says
I have a question. Can I use an egg in stead of Flax? we are fine with eggs and if we can how many do I use? Also what brand of semi sweet chocolate that is dairy free do you use?
Gwen Leron says
Hi Donna, I have never tested this recipe with eggs so I can't say for sure if it would work. The flax egg in this recipe would equal half of an egg so that may make things a little tricky. The chocolate I use for this particular recipe is a grocery store brand here in Canada called President's Choice, but there are many other brands to choose from, depending on where you are, different brands will be available. You can read through this article to get some chocolate chip recommendations if you can't find a dairy-free bar: "Are Chocolate Chips Vegan." If you don't want to use chocolate chips, look for a semi-sweet bar and read the ingredient label carefully to make sure what you are buying is dairy-free. Also read the "Chocolate Coating Ingredient and Substitution Notes" section above for some helpful info. I hope all of this helps you, please let me know if you have any further questions.