This page may contain affiliate links. Click to learn more. As an Amazon Associate I earn from qualifying purchases.
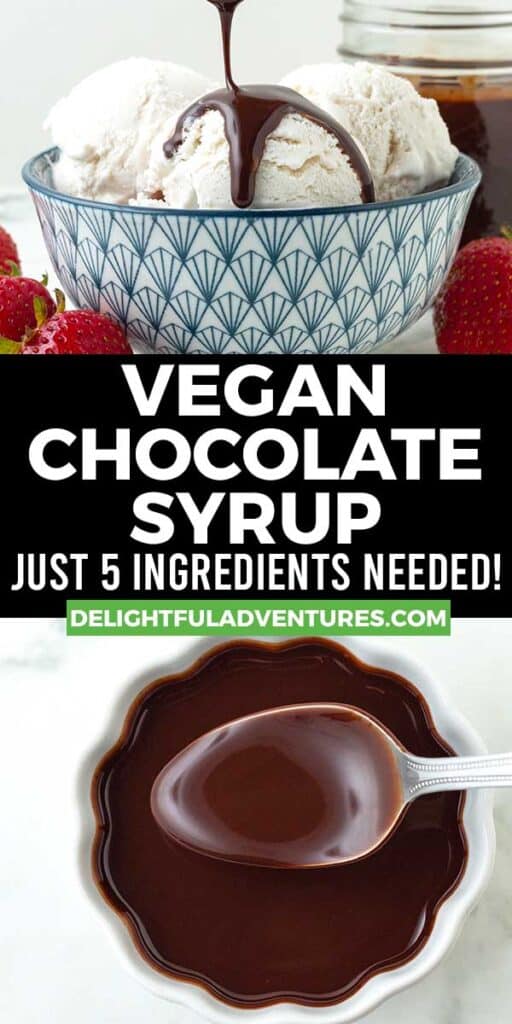
An easy recipe for homemade vegan chocolate syrup that takes just a few minutes to make with cocoa powder and a few other simple, dairy-free ingredients (no corn syrup!).
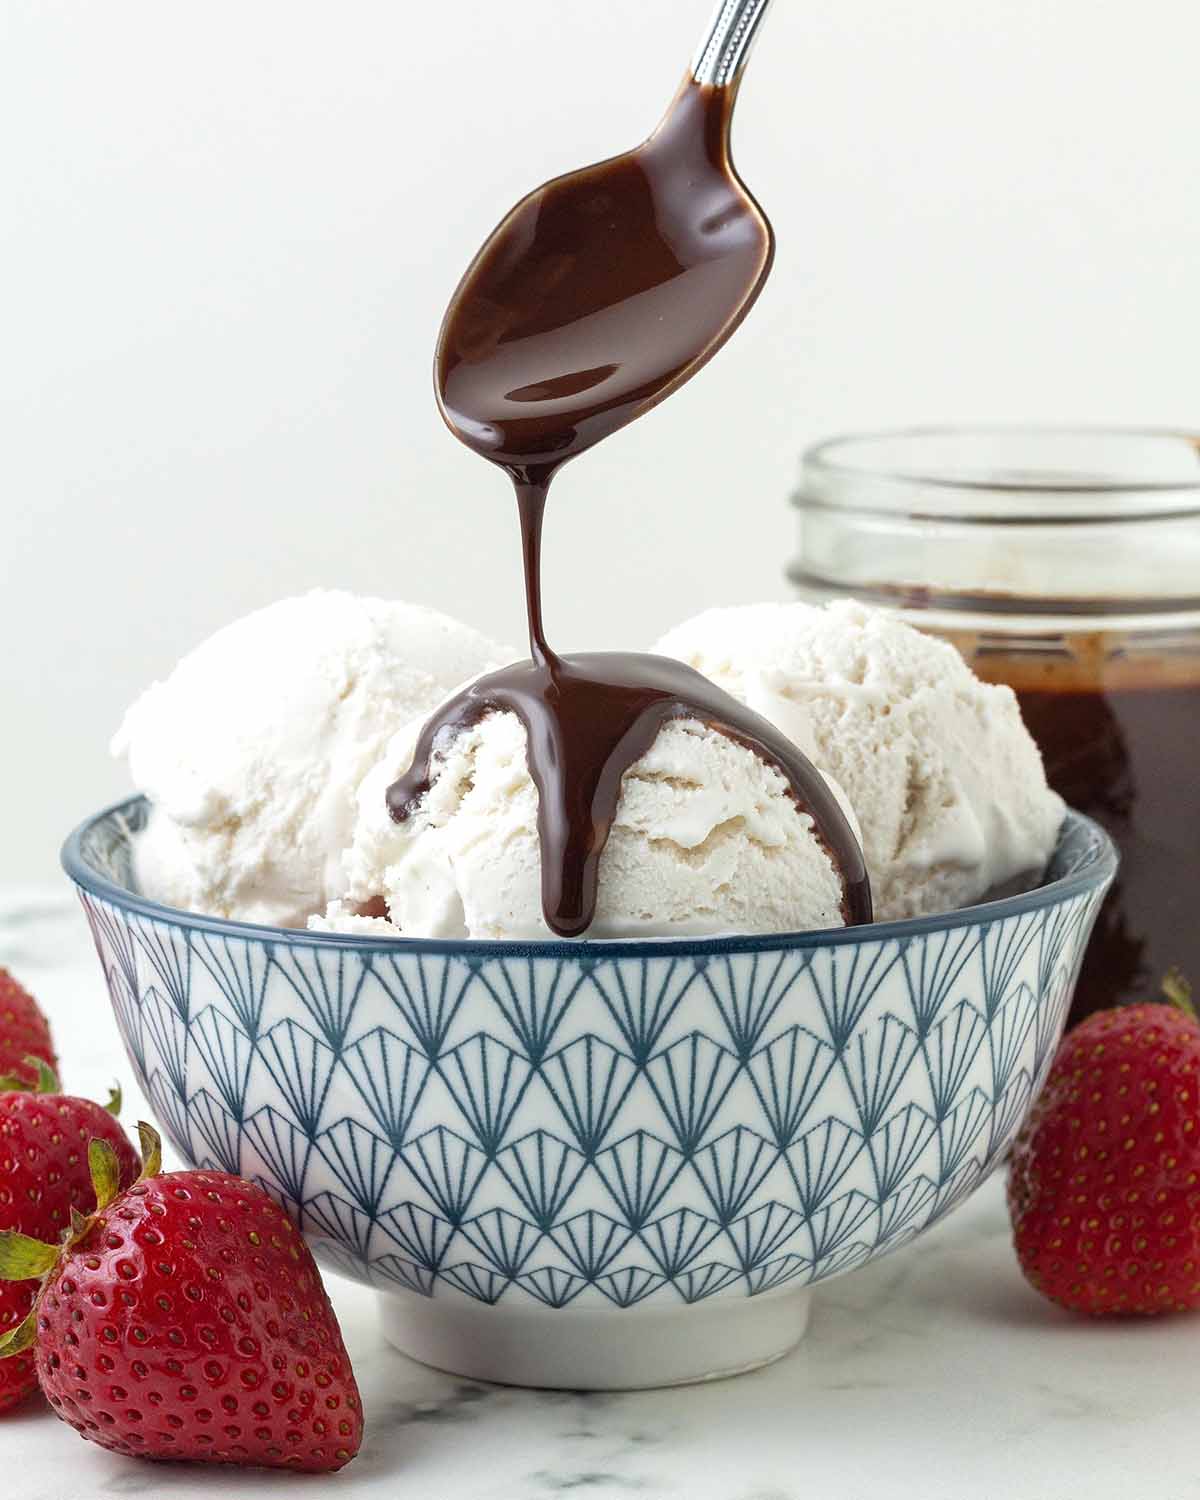
You'll never buy it again once you see how easy it is to make this simple recipe at home. Use it to top ice cream or your favourite desserts, add it to coffee drinks, or use it as a sweet dip for fruits. You can even make chocolate milk with it!
Save This Recipe!
In a hurry? Drop your email below, and this recipe will be sent straight to your inbox for later. You'll also get fresh recipes every week! You can unsubscribe anytime.
Many of us grew up making chocolate milk with store-bought chocolate syrup, whether it was Hershey's brand, Nesquik, or Brown Cow.
No matter which brand you used, you probably never realized how simple it is to make your own vegan chocolate syrup at home with just a few ingredients that have names you can pronounce and recognize! And yes, there are vegan versions you can buy but why buy it when it's so quick and easy to make it?
This version is made with ingredients that are naturally gluten-free, nut-free, dairy-free, and have no added oil (but make sure to read the labels before buying the ingredients if cross-contamination is a concern for you).
There are so many uses for this DIY chocolate syrup outside of drizzling it over vegan ice cream and making chocolate milk (and eating it from a spoon to satisfy your sweet tooth like I may have done once or twice!), I've listed more below.
So, let's get into it! Keep reading for everything you need to know about making the most chocolatey, multi-purpose dairy-free chocolate syrup you've ever had.
Ingredients You'll Need
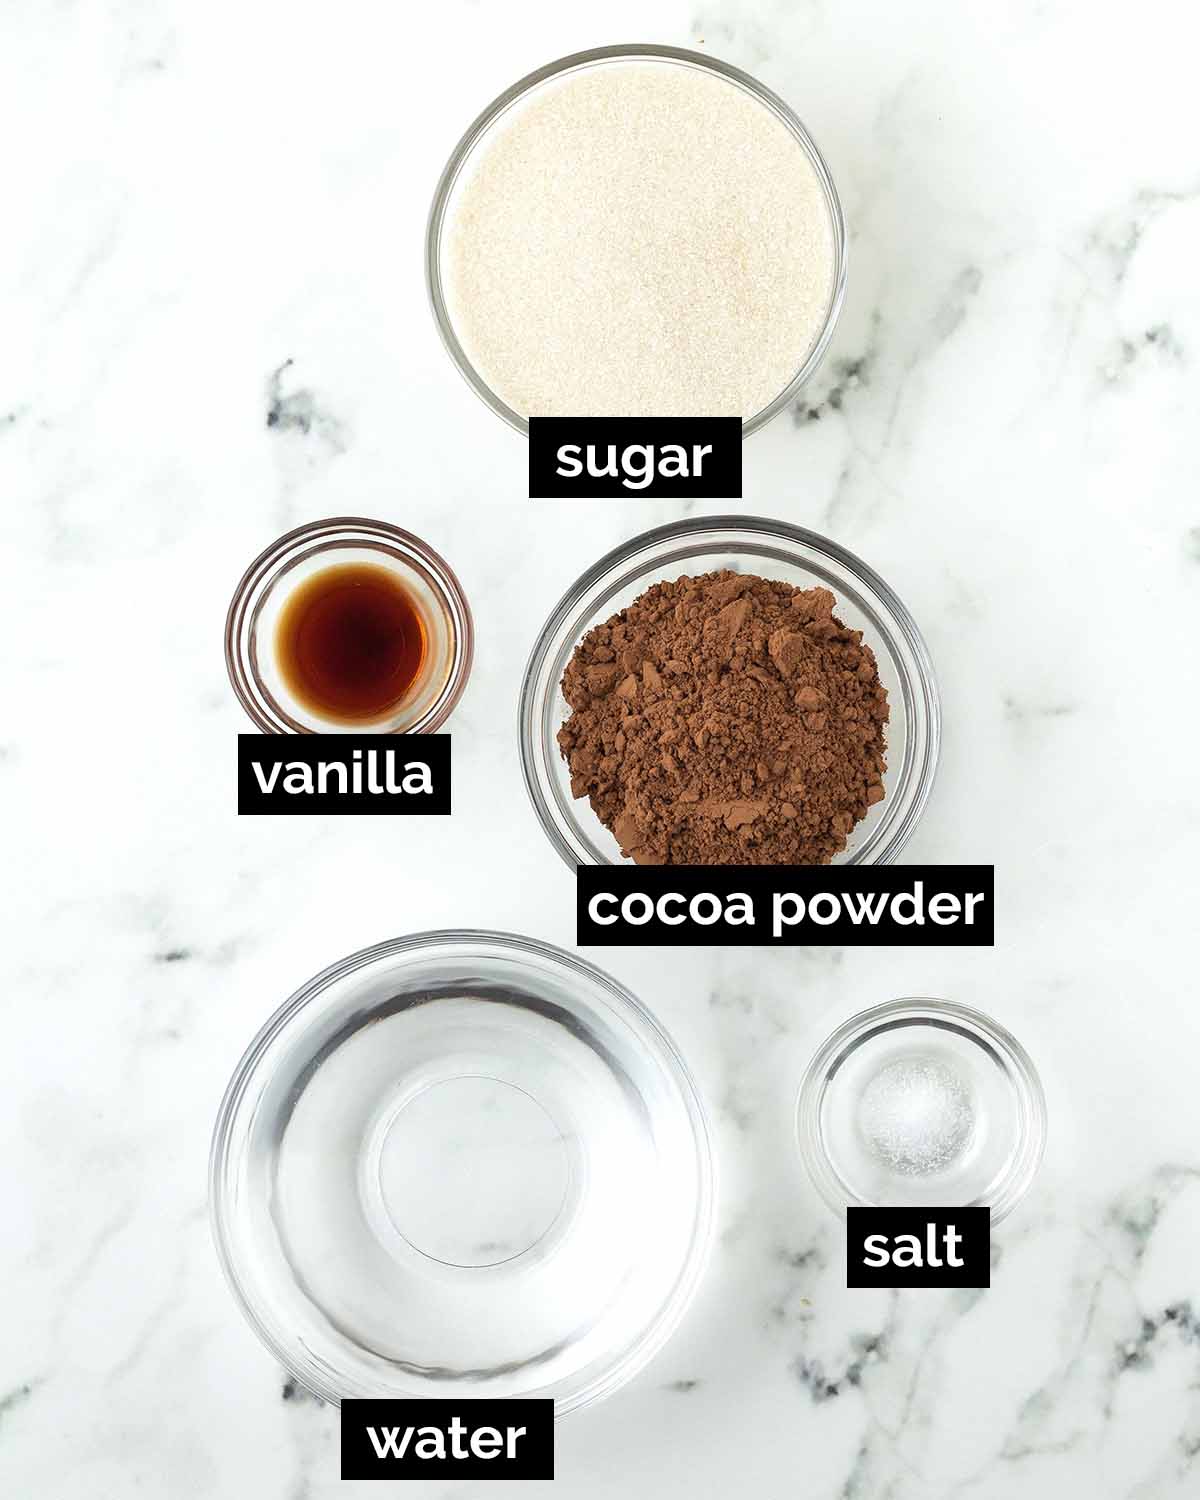
All you need is FIVE simple ingredients, no high fructose corn syrup, vegan butter, peanut butter, almond butter, or any other nut butter needed! And the best part? All of these ingredients are pantry staples for most of us.
Ingredient and Substitution Notes
Cocoa Powder - I use unsweetened Dutch-process cocoa powder when I make this recipe because it's what I always keep on hand for baking. If you prefer to use natural cocoa powder/cacao powder, keep in mind that natural cocoa powder tends to be slightly more bitter and acidic when compared to Dutch-process cocoa powder, so you may need to add a little more sugar to the syrup.
Pure cocoa powder doesn't contain any ingredients that are not vegan, but if you're looking for an ethical brand, read this article: "Is Cocoa Powder Vegan?"
Sugar - I use organic cane sugar but if you don't have this type, you can use regular white sugar instead. If you use white sugar, make sure that it's vegan.
Some brands use animal bone char to process their sugars, making them not vegan, however, this is not something you'll find listed on the package. To be 100% sure your sugar is vegan, buy organic since organic sugar does not go through the bone char process.
I have not tried making this recipe with liquid sweeteners like maple syrup or agave syrup and I would not recommend using one because it can affect the final flavour and throw the balance of wet to dry ingredients off. I have not tried making this recipe with coconut sugar or artificial sweeteners.
Salt - Just a little pinch of salt is needed to contribute in helping to balance the sweetness and bitterness of the ingredients, don't skip it!
Water - Chocolate syrup is made with water, but if you're looking to make vegan chocolate sauce instead because it's thicker, see the "Variations" section below.
Vanilla Extract - Vanilla also enhances the flavour and gives the syrup another level of flavour.
There aren't many ingredients in this recipe so use the best quality ingredients available to you so they can all shine through and provide the best flavour for your chocolate syrup.
How to Make It
(Note: I’ve outlined the step-by-step on how to make this recipe here, but find the full recipe, ingredients, and directions in the recipe card at the end of this post.)
1. In a small saucepan, whisk the dry ingredients together.
2. Add the water and whisk until everything has combined and there are no lumps. Scrape around the corners of the pot with a spoon to ensure there are no pockets of dry ingredients and that everything gets incorporated into the mixture.
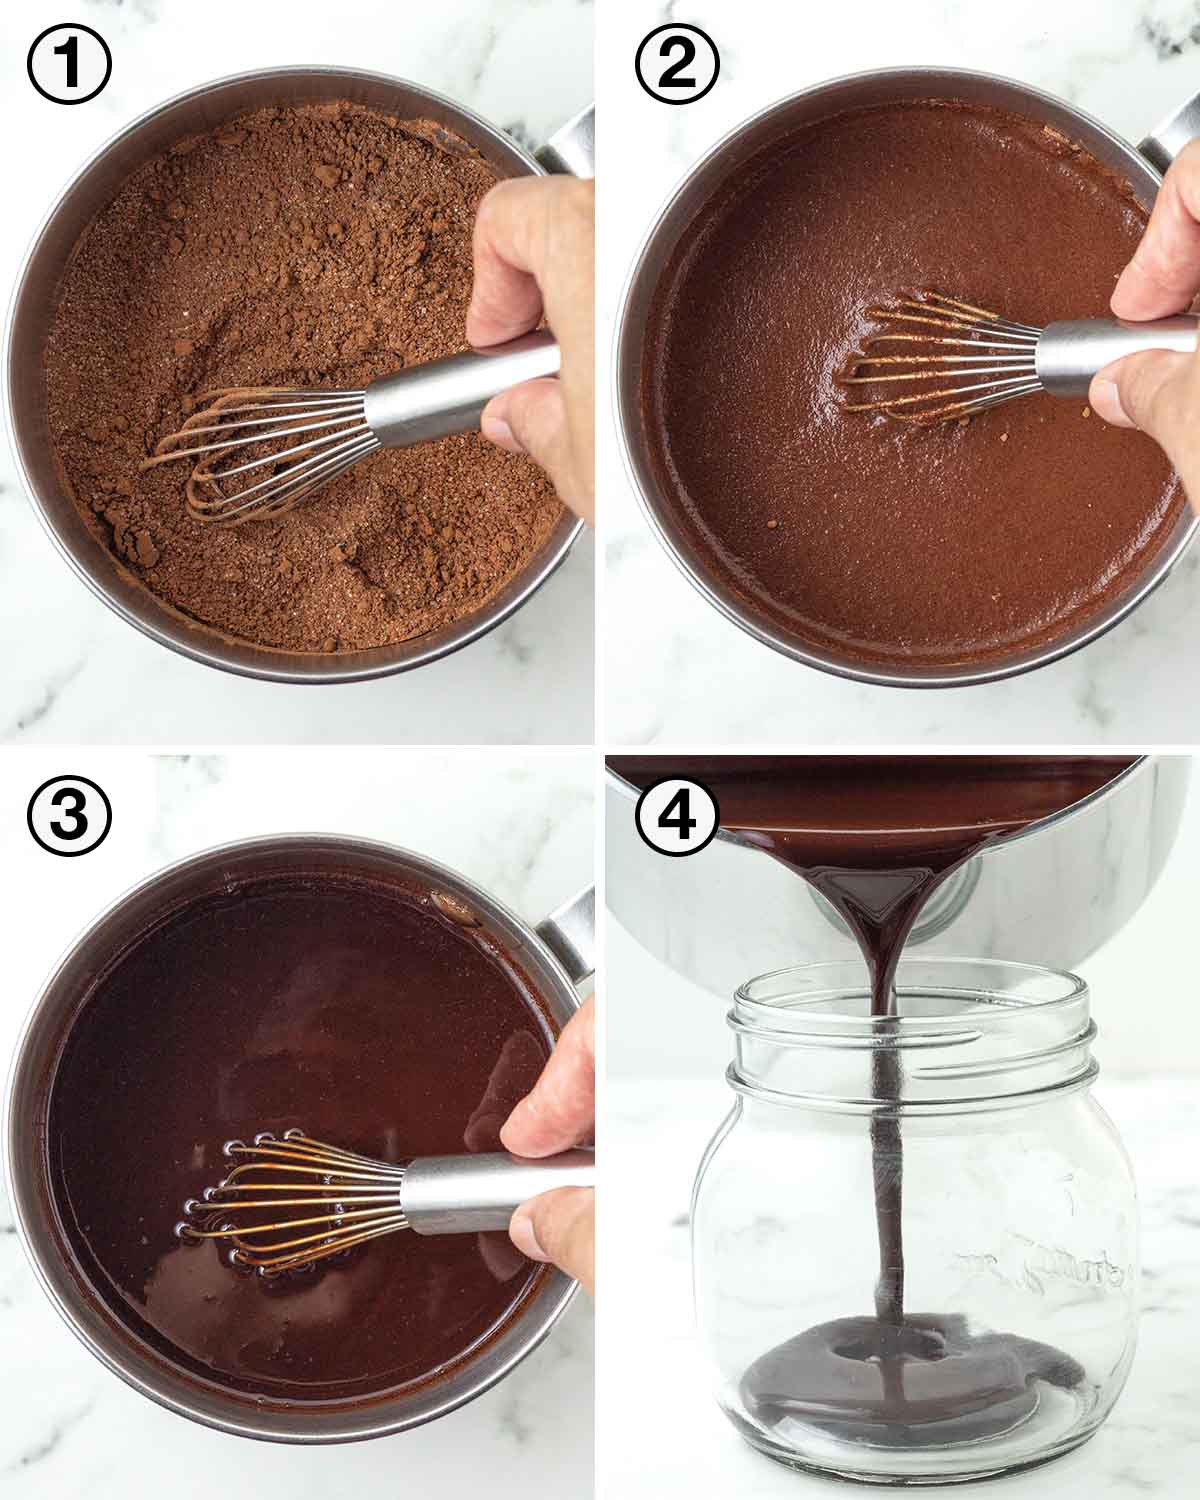
3. Heat the mixture so the sugar and cocoa powder dissolve. Remove from the heat and whisk in the vanilla extract. Allow the syrup to cool in the pot.
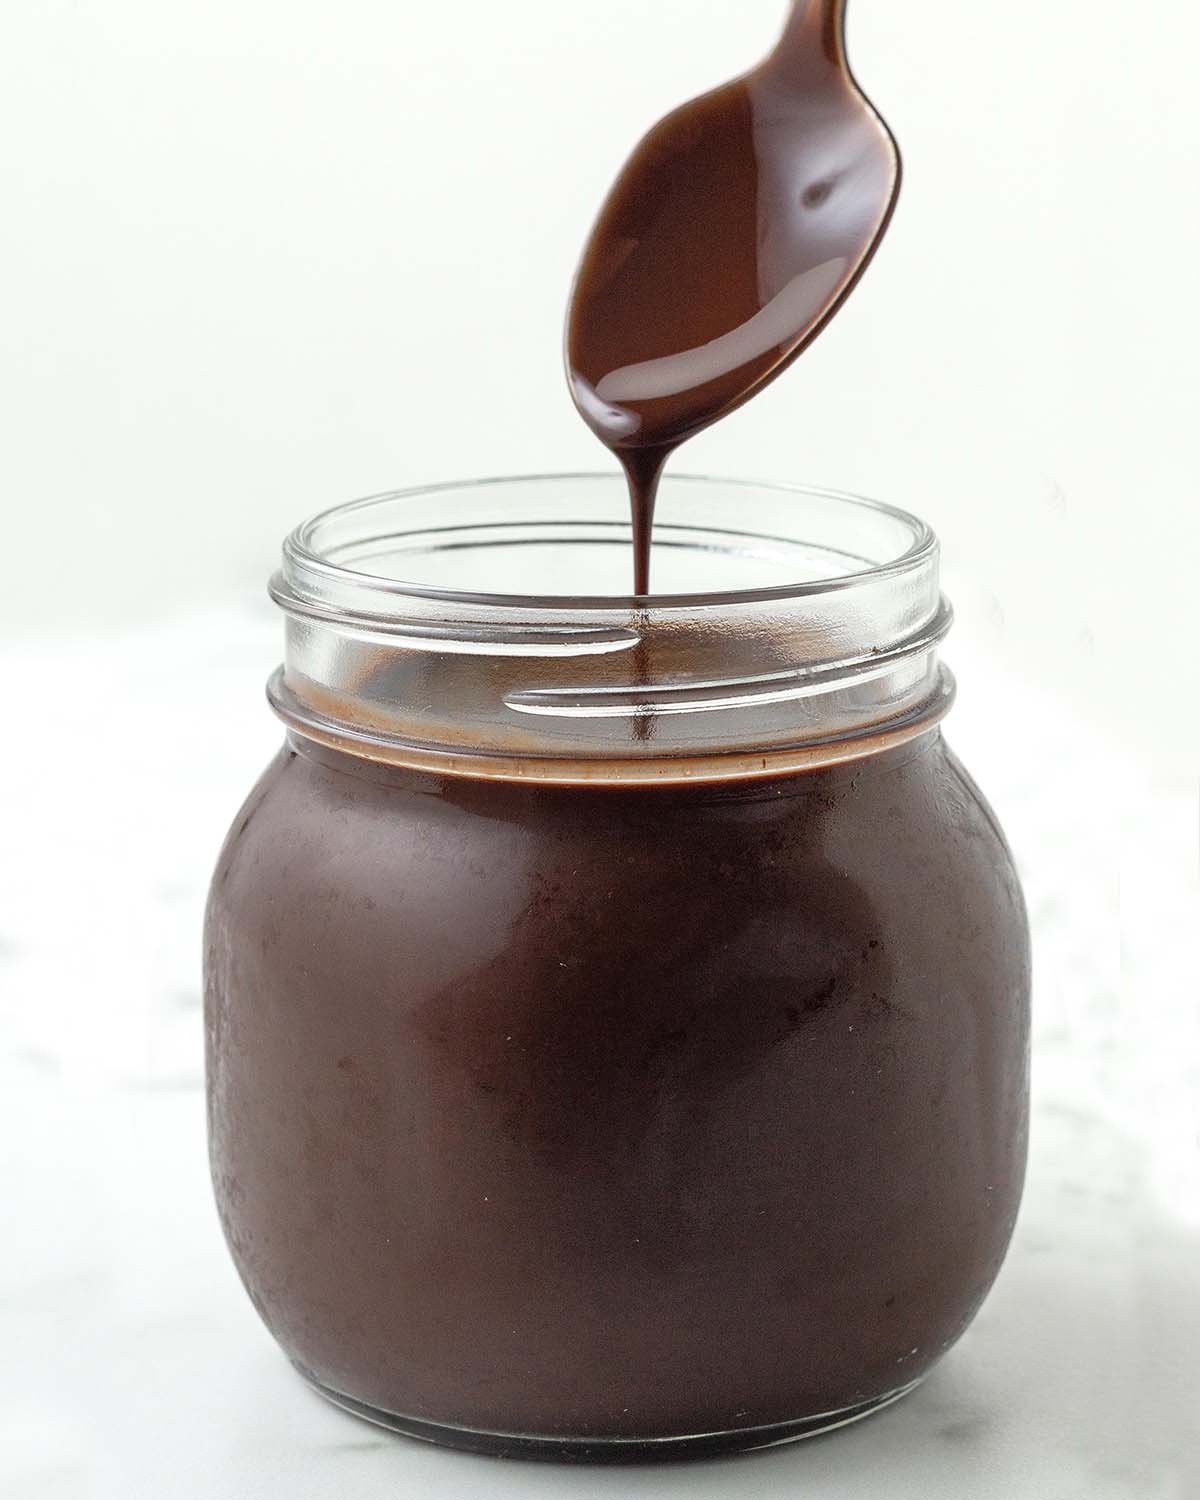
4. Once cooled, carefully pour the chocolate syrup into a mason jar or container and then refrigerate it so it reaches the right consistency.
NOTE: The syrup will be very watery/runny before you put it in the fridge to cool down but it will thicken a little after it has been chilled.
Variations
There are several ways you can customize this recipe. You can make it:
Vegan Chocolate Sauce - Use unflavoured, unsweetened plant-based milk instead of water. I recommend oat milk but any type like refrigerated coconut milk (not canned), almond milk etc. will work. Your homemade chocolate sauce will be thicker than chocolate syrup and will only keep in the fridge for about a week since it contains milk.
Mocha Syrup - Use decaf coffee instead of water when making the syrup. Depending on how strong you want the coffee flavour to be, you can either replace the full amount of water with coffee or do half water and half coffee.
Spiced Chocolate Syrup - Whisk in a pinch or two of ground cinnamon when you add the vanilla extract.
Flavoured Chocolate Syrup - Add a few drops of flavoured extract to the finished syrup, like peppermint or orange.
What to Use It For
There are so many ways you can use it, here are just a few ideas. You can:
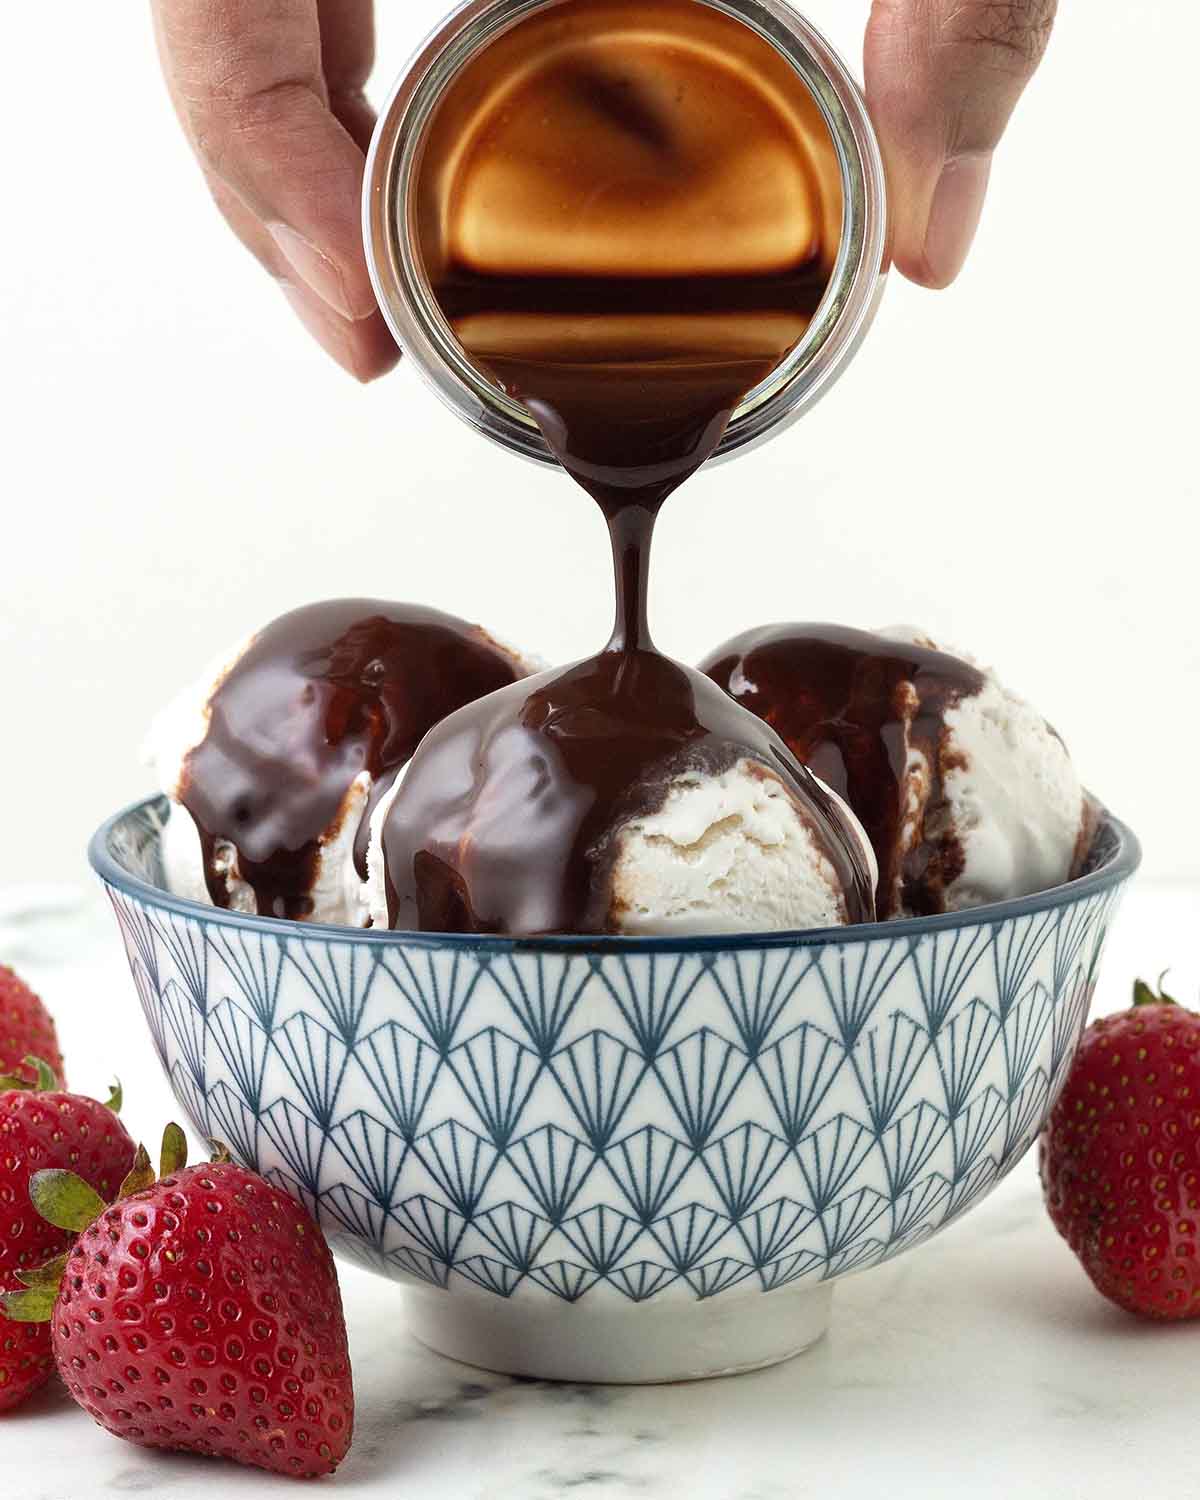
- drizzle it over ice cream (vegan chocolate ice cream or vanilla ice cream) or nice cream
- add it to a milkshake
- put it on a banana split or ice cream sundaes
- serve it on a dessert board as a dip or topping
- enjoy it on pancakes, waffles, crepes, and French toast
- swirl it into oatmeal (overnight, steel cut, or regular all work!)
- drizzle it on cake, brownies or cupcakes
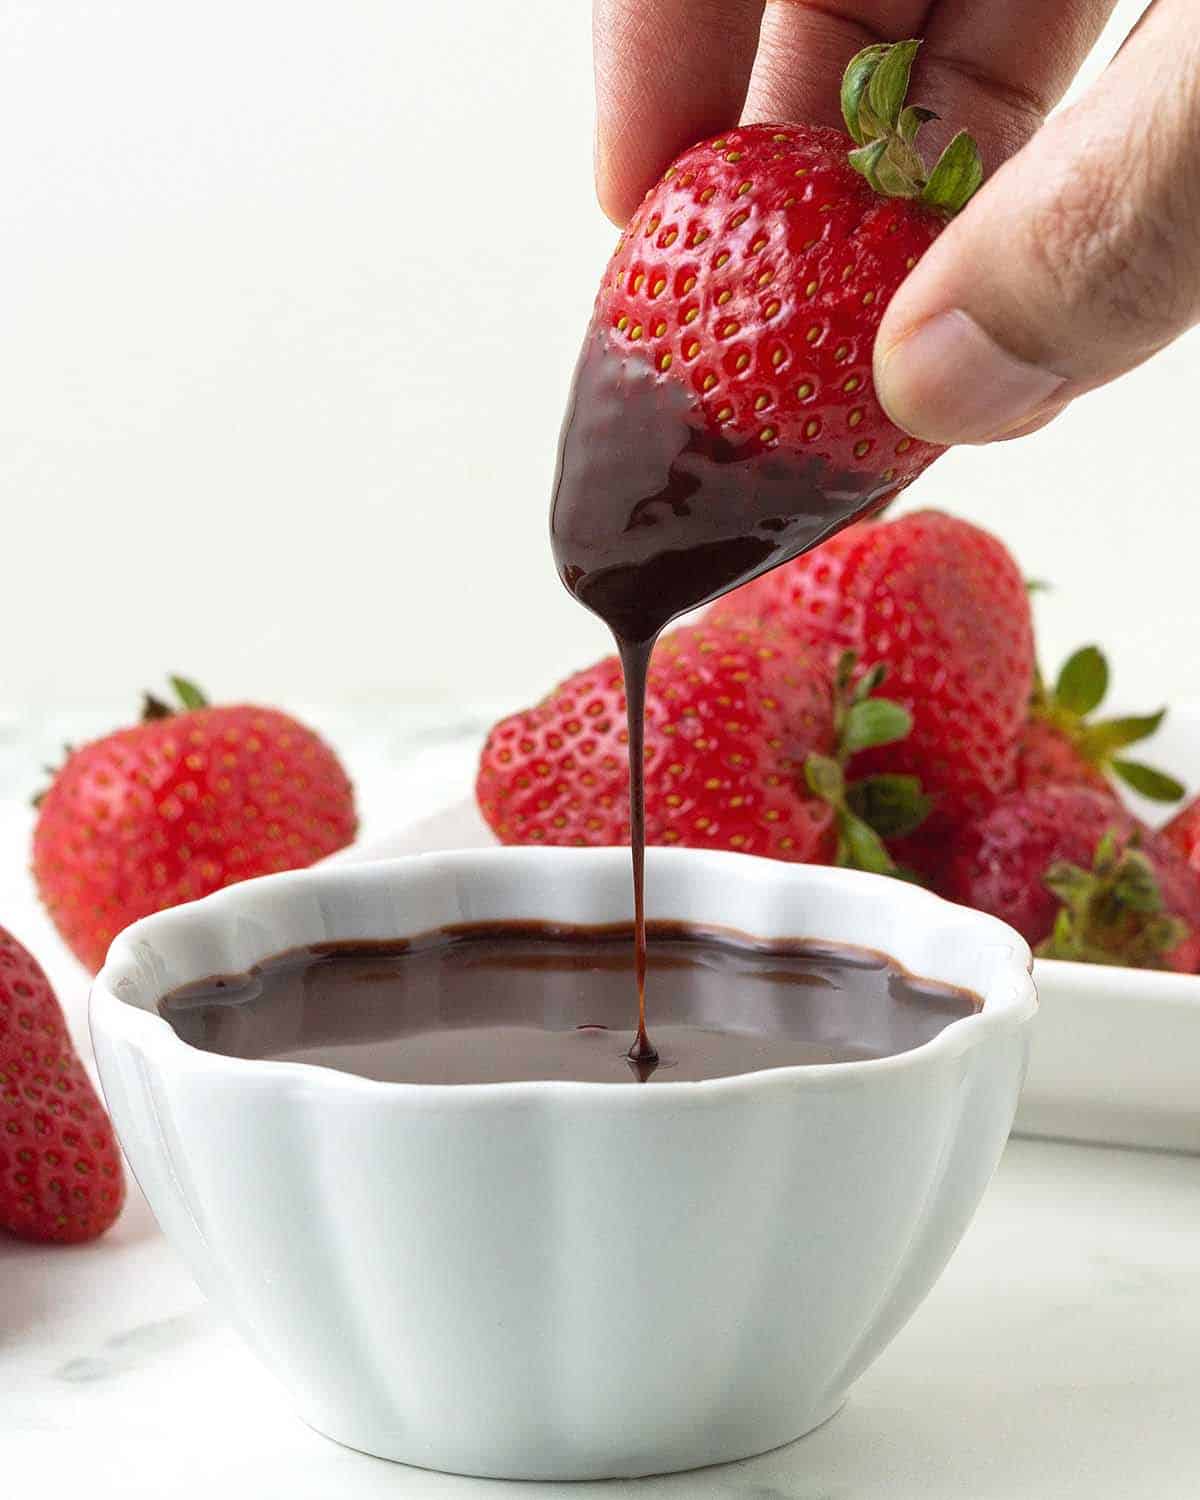
- use it as a vegan chocolate dipping sauce for fruits like mandarin segments, banana slices, cherries, pineapple, strawberries, and more!
It can also be added to hot or cold drinks, like these:
- almond milk latte
- vegan peppermint mocha
- vegan mocha frappe
- oat milk hot chocolate
- vegan hot chocolate
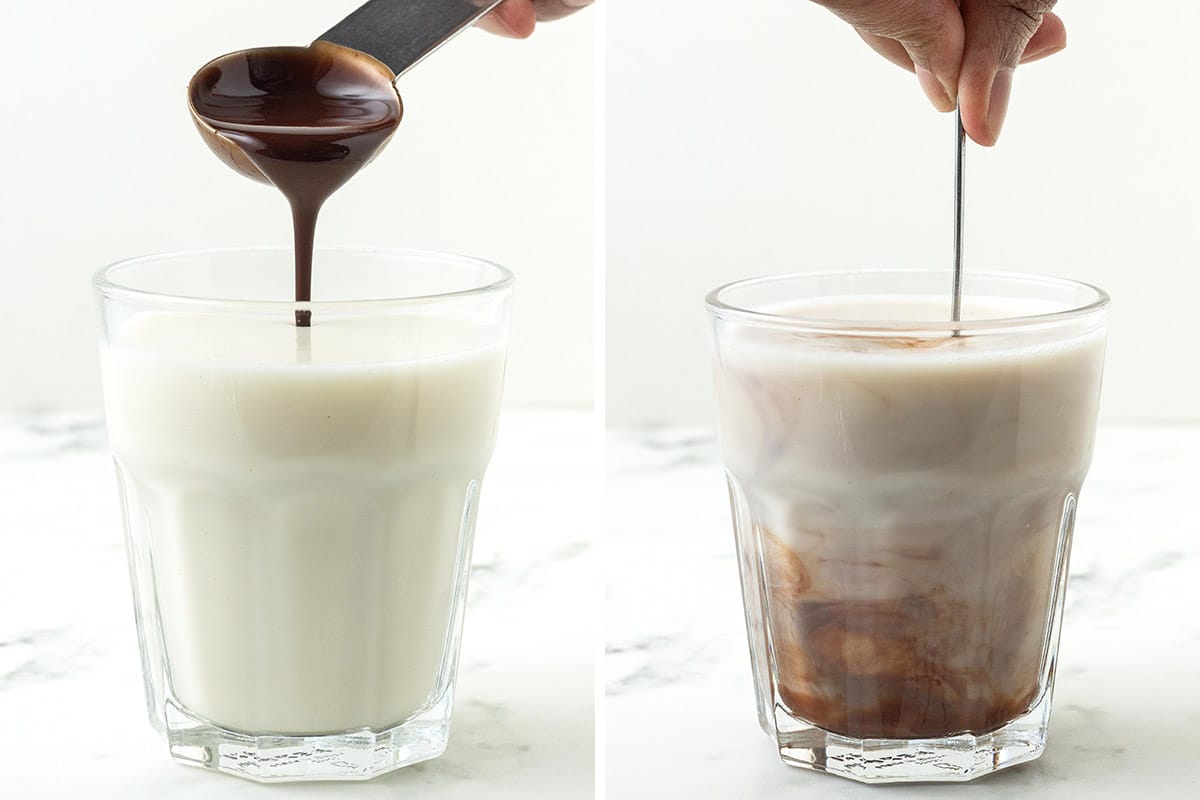
AND (I told you it was multi-purpose!) use it in iced or hot coffee or make drinks with it like hot chocolate, or chocolate milk (just add 2-3 tablespoons of chocolate syrup to hot or cold plant milk, stir well, and enjoy).
Storing and Freezing
Store your chocolate syrup in the refrigerator in an airtight container or jar for up to three weeks. Stir very well before each use.
You can also freeze the syrup in an airtight container or jar for up to three months. Thaw in the refrigerator when you are ready to use it.
Looking for more delicious dessert toppings? How about strawberry sauce, cherry sauce, blueberry sauce, or peach sauce?
Tips for Success
I tested this recipe several times to get the correct ratio of water to sugar to cocoa powder. Here are a few tips I always recommend when making any of my recipes and a few that are specific to this particular recipe to ensure you have success when you make it.
- Measure and have all your ingredients ready to go before starting. This will make the process run smoothly, quickly, and easily.
- Measure your ingredients correctly. I highly recommend using a scale (this is the one I have) and my weight measurements when making this recipe.
- If your cocoa powder is clumpy, sift it before adding it to the other ingredients.
- Don't add the water to the dry ingredients until all lumps have been whisked out. You may need to use the back of a spoon to break them up. If water is added before they are taken care of, it will be very hard to get rid of them.
- Keep a close eye on it while it's heating, don't let it boil. You run the risk of the syrup burning which will give it an unpleasant, bitter flavour.
- Make sure to whisk constantly during the heating time, and don't leave it unattended, this mixture will boil over if it gets too hot.
- This recipe, as written, will give you a not-too-sweet dark chocolate syrup, however, if you would like it to be sweeter, see the recipe notes for more details.
- Don't skip the chilling time. Chilling allows the flavour of the syrup to develop further and gives it time to reach its full thickness. After chilling, it will remain on the runny side, which is normal and how the recipe is meant to be. Remember that this is chocolate syrup so it will never be as thick as chocolate sauce or hot fudge sauce. Take note of the chill time before preparing.
- Read this post from top to bottom before you start. It's not difficult to make but I’ve included a lot of tips and tricks I've gathered while testing, things you may not think of. Also, read through the full recipe before getting started and take the chilling time into account so you know exactly how long the recipe will take from beginning to end.
- Follow the recipe exactly as it’s written for the very best results.
Recipe FAQ
What's the Difference Between Chocolate Syrup, Chocolate Sauce, Hot Fudge Sauce, and Chocolate Ganache?
While all of these things are delicious, they are all different even though their names are sometimes used interchangeably.
* Chocolate Syrup - Has a thinner consistency and is made with water and sometimes corn syrup. It is almost always oil-free and does not contain any added fat.
* Chocolate Sauce - Has a thicker consistency than chocolate syrup and is made with either milk, cream, and sometimes butter which can all be either plant-based or dairy. Some recipes use cocoa powder and some use melted chocolate. It can also have added cornstarch and/or corn syrup to help thicken it.
* Hot Fudge Sauce - This is usually made with cream and butter (non-dairy milk or dairy) and is very thick and rich. It can be made with cocoa powder, melted chocolate/chocolate chips, or both.
* Chocolate Ganache - This is very thick and is made with melted chocolate and heavy cream (vegan or dairy). It's so thick it can be used as frosting.
Will This Chocolate Syrup Harden When I Put It On Cold Ice Cream?
No, it will not. The type of chocolate that will harden and become a thin delicious shell is called magic shell or chocolate shell. It's typically made with melted chocolate and coconut oil.
Are you looking for more sweet treats? Have a look through all of my vegan dessert recipes for some more ideas!
If You Make This Recipe...
Please tell me about it and how you used this sweet treat! Did you top vegan vanilla ice cream with it? Did you drizzle it on brownies? Did you add it to a fancy coffee drink? Leave a comment and star rating below or you can post a picture on Instagram and tag me so I can see it. (I’m @delightfuladventures on Instagram!)
If You Like This Recipe...
You may like these other vegan chocolate recipes:

Easy Vegan Chocolate Syrup with Cocoa Powder
Suggested Equipment:
Ingredients:
- ¾ cup (150g) granulated sugar
- ½ cup (42g) Dutch-process cocoa powder (see note below)
- ⅛ teaspoon salt
- ⅔ cup (160ml) water
- 1 teaspoon vanilla extract
Instructions:
- Add the sugar, cocoa powder, and salt to a small saucepan and whisk well until everything has combined and no lumps remain.
- Add the water and whisk well. Scrape around the corners of the pot with a spoon to be sure no dry ingredients remain. Once all ingredients have combined to form a thick mixture, place the pot over medium-high heat.
- Continuously whisk while the mixture simmers. It will start to look glossy and begin to bubble around the 3 ½ minute mark. Keep a close eye on the pot, the syrup can boil over if it is heated for too long, don't allow it to boil.
- Simmer for another 30 seconds (for a total heating time of 4 minutes), remove the pot from the heat and whisk in the vanilla extract.
- Allow the chocolate syrup to sit in the pot for 15-20 minutes. Whisk every 5-10 minutes during the rest time.
- Pour the semi-cooled chocolate syrup into a jar and let it sit until it has fully cooled.
- Place the lid on the jar and refrigerate for at least 4 hours, it will thicken slightly as it chills. Stir well before serving.
Recipe Notes:
- Please read all of the information, troubleshooting, and FAQ info above, as well as the notes below before making this recipe.
- This recipe makes a little over 1 ¼ cup of chocolate syrup and can be doubled if needed. If doubled, the heating time will be a little longer since it will take more time to come to a simmer.
- Dutch process, natural, or cacao powder can be used, make sure it's unsweetened.
- This recipe, as written, will give you a not-too-sweet dark chocolate syrup, however, if you would like it to be sweeter, use 1 cup of sugar (200g) instead of ¾ cup.
- Store in the refrigerator in an airtight jar or container for up to 3 weeks. Stir very well before each use.
- To freeze, put the syrup in an airtight container or jar for up to three months. Thaw in the refrigerator when you are ready to use it and stir very well before using.
- The nutrition info listed below is for 1 of 10 servings (each serving is 2 tablespoons) with the recipe made exactly as written. Nutritional data is only to be used as a rough guide. Click here for more info on how nutrition info on this website is determined.
Angelina says
I love it with my ice hot chocolate
Gwen Leron says
Wonderful news, Angelina! I'm glad you're enjoying it 🙂