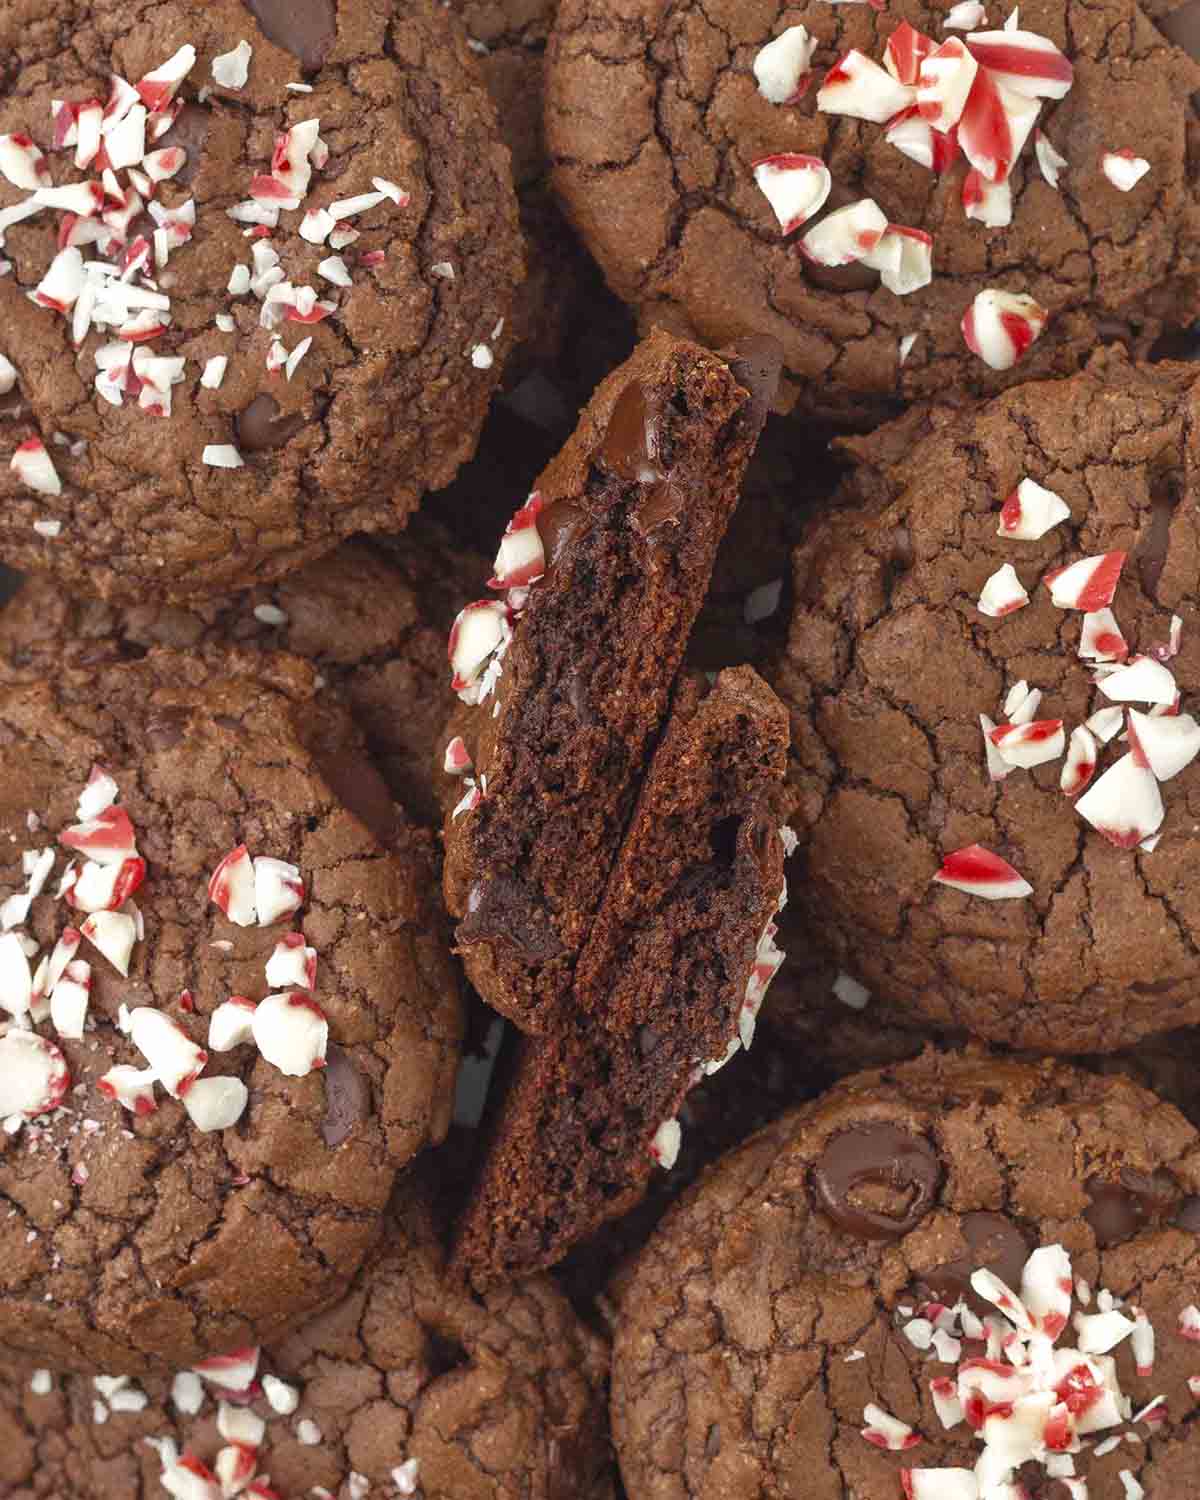
Soft and chewy on the inside with crisp outer edges, these fudgy vegan chocolate peppermint cookies are filled with chocolate chips and peppermint flavour, one of the best festive mixes for the holidays.
These double chocolate cookies are topped with crushed candy canes and also happen to be gluten-free (if you use certified gluten-free oat flour!). They make the perfect addition to your annual Christmas baking list.

Save This Recipe!
In a rush? Don't have time to scroll through this page right now? Enter your email below and this recipe/article will be sent straight to your inbox so you can come back to it when you're ready. Plus, you'll receive delicious recipes every week! You may unsubscribe at any time.
Chocolate mint is a popular combination around here (see my vegan peppermint patties for another example!) during the holiday season. I hope you love it as much as I do because I have a new recipe that once again features this perfect flavour combination.
These are my vegan chocolate peppermint cookies and you're going to love everything about them! It's another recipe to add to your vegan gluten-free Christmas cookies list.
Similar to my chocolate crinkle cookies, they're soft and chewy, they're filled with chocolate (they are double chocolate peppermint cookies after all!), they're easy to make, and they'll fit right in with your Christmas baking list.
Speaking of Christmas baking lists, check out my vegan gluten-free Christmas desserts, there's something for everyone! (Your non-vegan friends and family, won't know the difference!)
Now let's discuss everything you need to know to make these delicious holiday cookies.
Ingredients You'll Need
Below you will find info about the ingredients you'll need, and as always, I recommend sticking with the recipe the way it's written for the best results, but I've included info about each ingredient and what you can and cannot substitute.
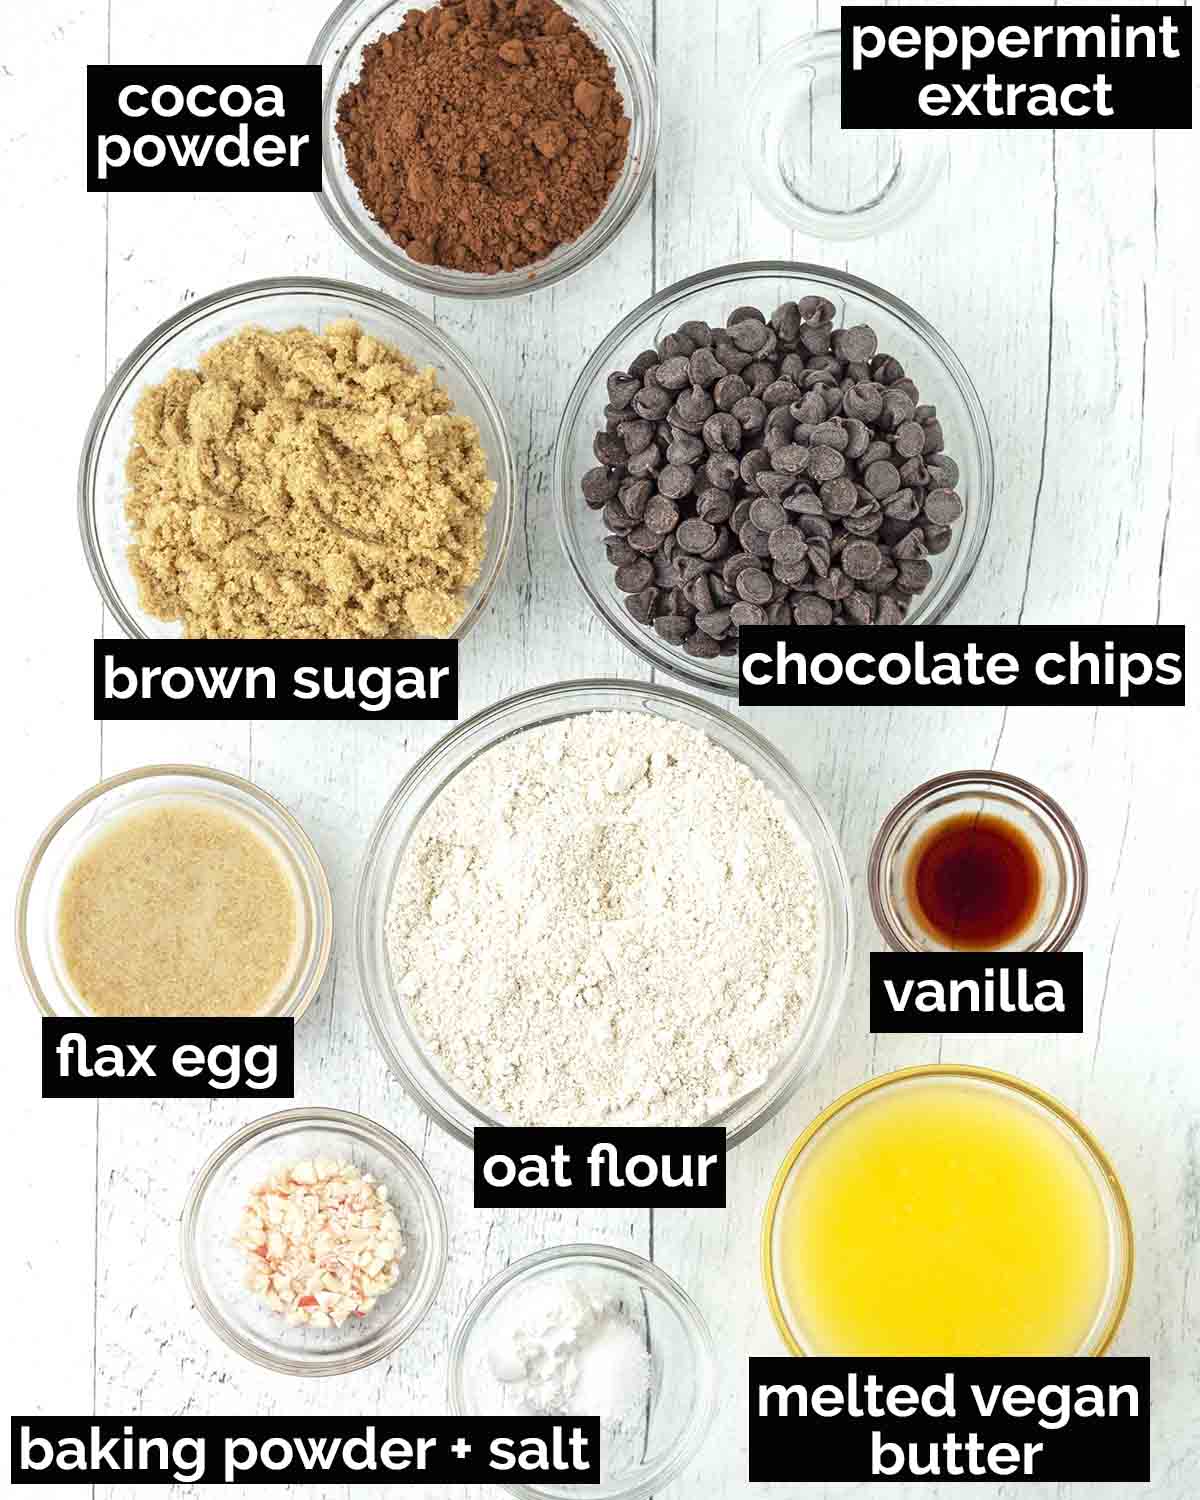
Ingredient and Substitution Notes
Oat Flour - You can use either store-bought oat flour or homemade oat flour, I have not tested this recipe with any other type of flour. If you make the oat flour yourself, make sure to sift it before measuring or weighing it. Homemade oat flour made in a high-speed blender or food processor does not get as fine as store-bought which is why sifting is necessary.
If it's not sifted, the texture of your cookies will not be correct, they will be grainy rather than smooth and soft. Also, make sure to buy certified gluten-free oat flour (or certified gluten-free oats for homemade flour) if you need the recipe to be 100% gluten-free.
NOTE: When baking, measuring your flour accurately is so important to get the best results, even when using oat flour. Check out my article about how to measure flour correctly before you start.
Vegan Butter - Use unsalted vegan butter that comes in stick form. If you only have salted butter, omit the salt from the recipe.
I tested with coconut oil and while the result was good, I prefer the vegan butter version better. If you do use coconut oil, use refined coconut oil, don't use unrefined / virgin or your cookies will have a coconut taste that competes and mostly overpowers the mint flavour.
I have not used vegetable oil, nor have I tried to make this recipe oil-free.
Cocoa Powder - I use Dutch-process unsweetened cocoa powder in all of my recipes. Dutch-processed cocoa powder provides a rich chocolate flavour to baked treats. I have not tested this recipe with natural cocoa powder / cacao powder. If you are looking for an ethical cocoa powder brand, read my article "Is Cocoa Powder Vegan" to get a list of options.
Brown Sugar - You'll need light brown sugar. I tested with coconut sugar and the result was good, but the texture was a little different. The cookies made with brown sugar provided a better result and texture. Stick with brown sugar for the best results.
If you want to use coconut sugar for a refined sugar-free version, keep these points in mind. I have not tested this recipe with any liquid sweeteners like maple syrup or agave, I don't recommend them since other parts of the recipe will also have to change to accommodate the extra moisture.
Flax Egg – Since this recipe is made without eggs, the flax egg acts as a binder. If you can’t have flax, use ground chia seeds as a replacement for the ground flax seeds.
Baking Powder - Don't leave this ingredient out, it helps the cookies rise a little and have a little crispness on the outside, and it also helps to give them the overall perfect texture. It cannot be replaced with baking soda.
Peppermint Extract - Make sure you are using pure peppermint extract and NOT mint extract or spearmint extract they do not have the same flavour. I have not tested this recipe with peppermint oil, but I do know that a little goes a long way, so if that is all you have, just start with a drop or two and you will have to go by taste to decide how much is enough.
Salt and Vanilla Extract - Two important ingredients in any cookie recipe that both work to enhance the flavour.
Chocolate Chips - I always use vegan semi-sweet / dark chocolate chips, use your favourite vegan chocolate chips (chocolate chunks can be used, too!). Not sure which brands make vegan chocolate chips? Read this article: "Are Chocolate Chips Vegan?" for a large list of recommendations to look for at your grocery store.
Crushed Candy Canes - I usually crush whole candy canes but you can buy crushed candy canes so you don't have to do it yourself. For a list of vegan candy cane brands, read this article: "Are Candy Canes Vegan?"
Are you new to vegan gluten-free baking? If so, be sure to read all of my vegan gluten-free baking tips!
How to Make Them
(Note: I’ve outlined the step-by-step on how to make this recipe here, but find the full recipe, ingredients, and directions in the recipe card at the end of this post.)
1. Mix the dry ingredients in a medium bowl.
2. Mix the wet ingredients in a large bowl.
3. Add the dry ingredients to the wet dry ingredients and mix with a wooden spoon or hand mixer until a sticky cookie dough has formed.
4. Add the chocolate chips.
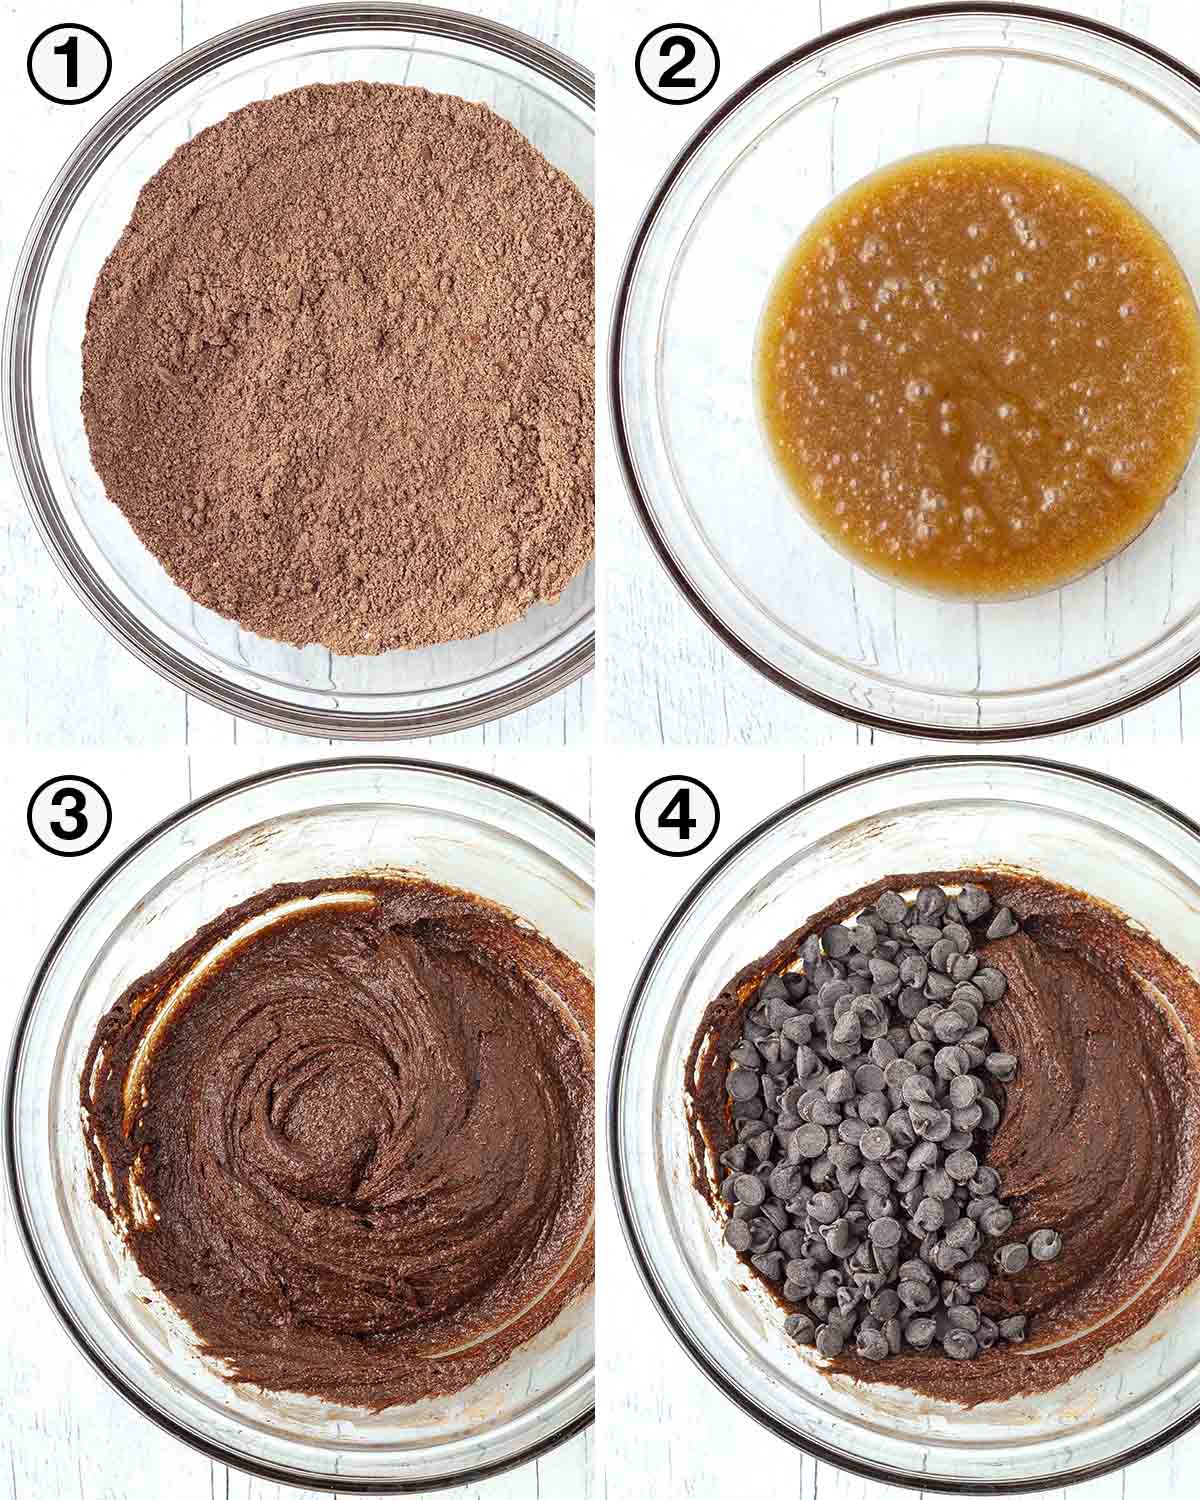
5. Stir until the chocolate chips have been incorporated evenly into the cookie dough.
6. Using a medium cookie scoop (or a tablespoon) scoop the dough and place each cookie dough ball onto your baking sheet.
7. Flatten each cookie very slightly, not too much, they don't spread a lot while baking, so they need a little help to get started. Bake the cookies.
8. Carefully remove the cookie sheet from the oven and allow the cookies to rest for at least 5 minutes on the cookie sheet. While they are resting, sprinkle the crushed candy canes onto the tops of each cookie.
This step must be done quickly while the cookies are still hot so the candy canes stick.
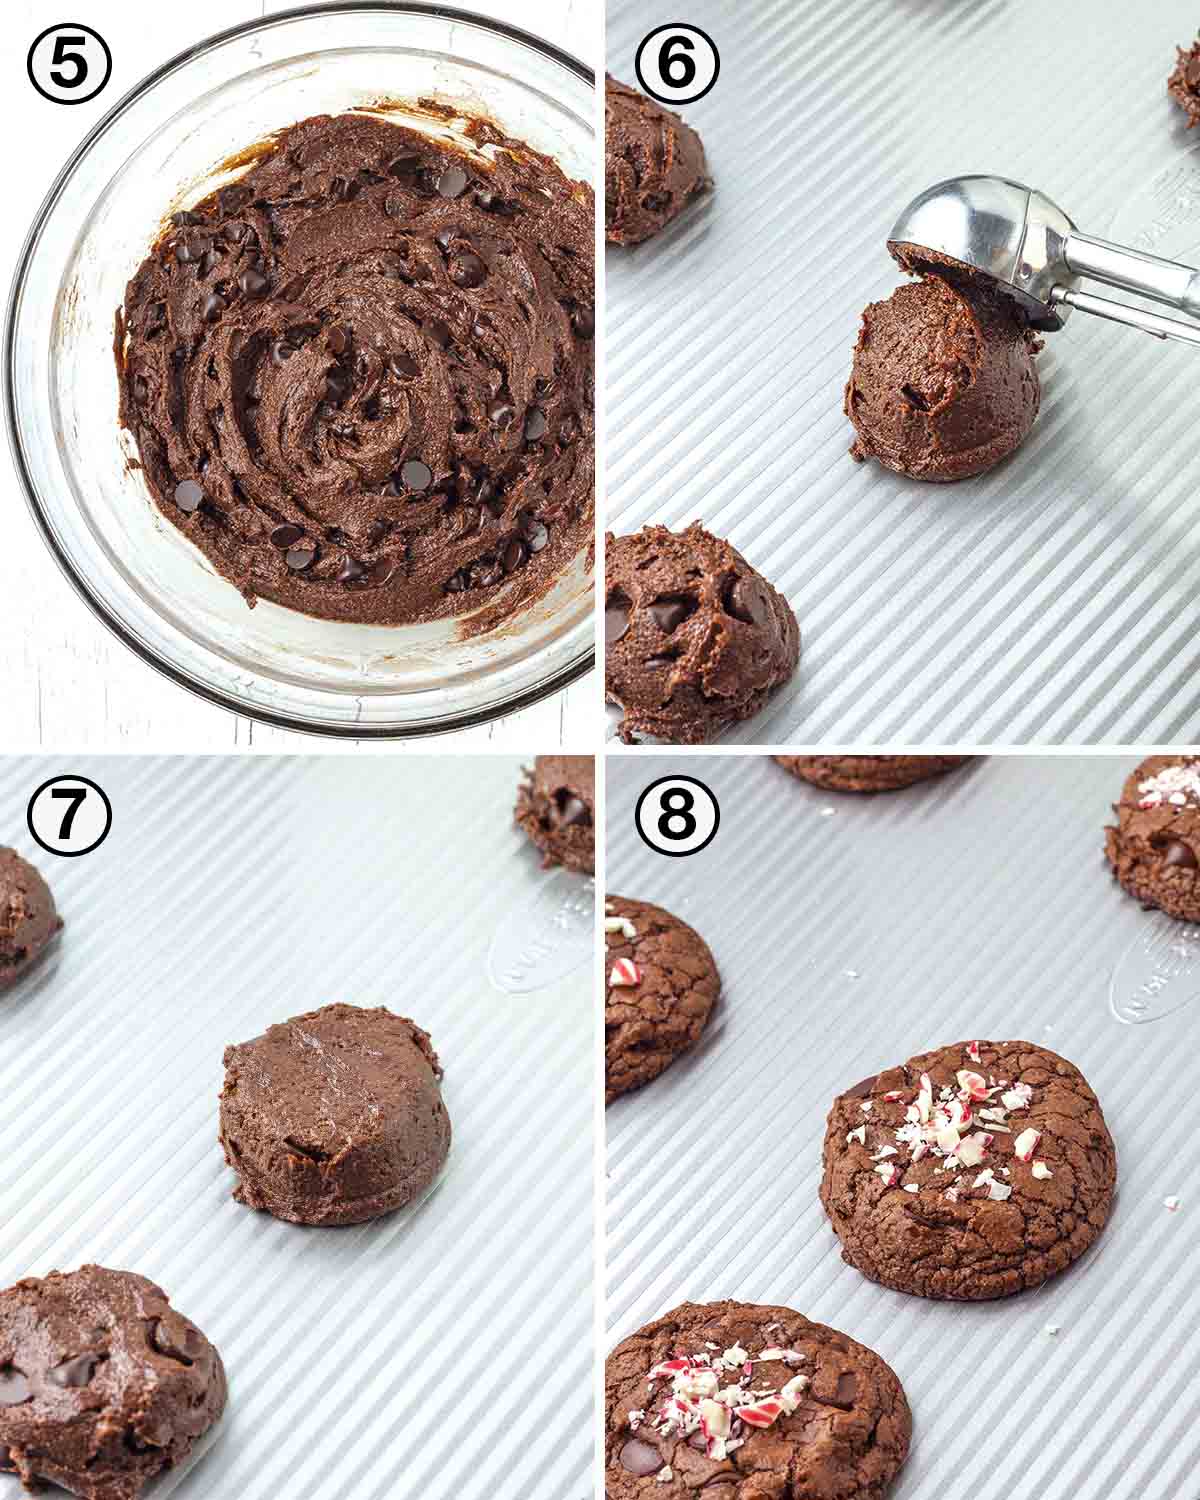
After the resting time has passed, remove the cookies from the cookie sheet and place them on a cooling rack.
Allow them to cool almost fully before serving, when hot, they are very delicate and can fall apart easily, but they firm up properly when cooled.
Enjoy them with any of the following warm, festive drinks:
- vegan peppermint mocha
- vegan gingerbread latte
- creamy vegan hot chocolate
- oat milk hot chocolate
- peppermint hot chocolate
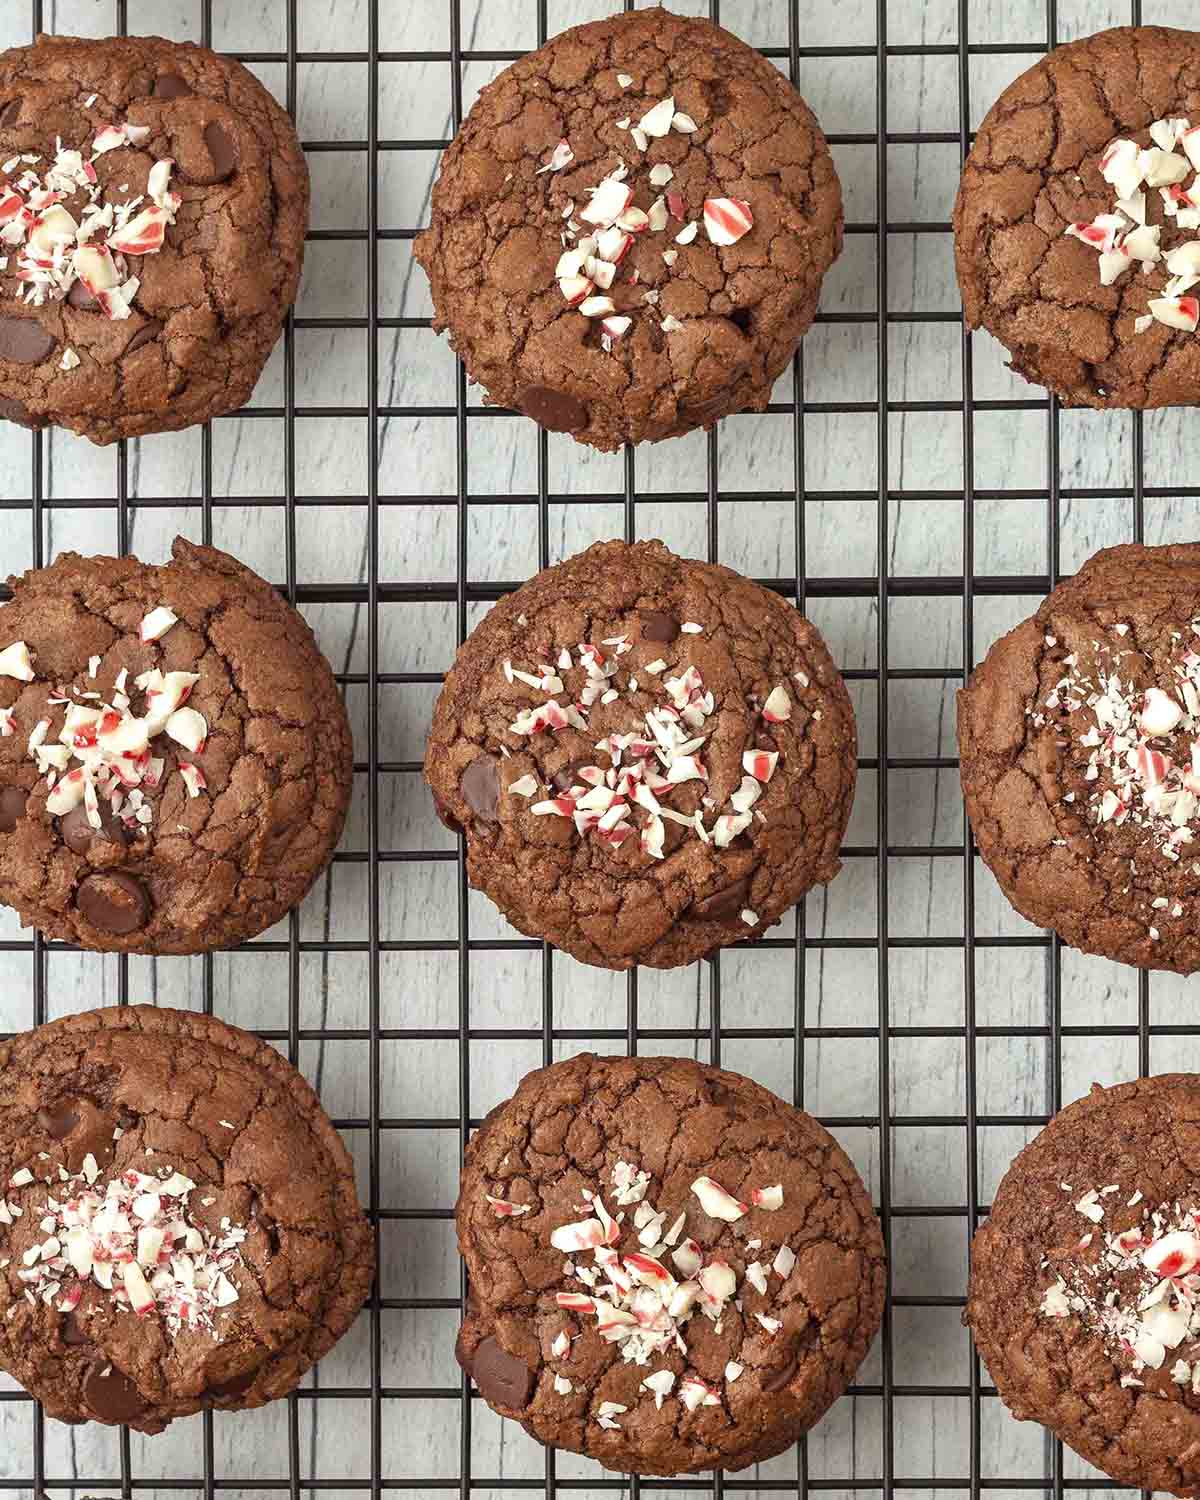
What's the Texture Like?
Immediately after the cookies come out of the oven, they're going to be very soft and delicate. Don't try to handle them or they will fall apart, let them rest on the cookie sheet for at least 5 minutes.
Once the 5 minutes have passed, you'll be able to transfer them from the cookie sheet to a cooling rack.
When they've cooled, the outer edges will be crisp and the inside will be soft. While they're still warm, the chocolate chips will be melty, making the centers gooey and delicious and so good with a cold glass of almond milk or your favourite dairy-free milk!
After you store them, they will remain the same, crisp on the outside and soft on the inside. The only difference will be that the chocolate chips are no longer melty and warm, but nothing is stopping you from warming them up a bit so they return to their fresh-out-of-the-oven state!
Storing and Freezing
Wait until the cookies have fully cooled and store them in an airtight container at room temperature for up to six days. These cookies lose moisture the longer they are stored, so the quicker they are enjoyed, the better.
Freezing Baked Cookies
Freeze your cookies in single layers in a freezer bag or a freezer-safe container, with parchment paper separating each layer, for up to 2 months.
When you're ready, thaw them in the refrigerator or at room temperature.
Making Ahead
To Freeze the Cookie Dough for Baking Later
Follow steps 2-8 in the recipe, then place the cookie sheet in the freezer. Once completely frozen, place the cookie dough in an airtight, freezer-safe bag or container, with parchment paper separating each layer, and freeze for up to 2 months. Don't forget to flatten them slightly before placing them in the freezer.
When you’re ready to bake them, remove them from the freezer, place them on a prepared baking sheet, and bake. Info about baking from frozen can be found in the recipe notes below.
Want more cookies? Be sure to look through this list to see all of my vegan gluten-free cookie recipes!

Tips for Success
This recipe was texted extensively, here are my tips to make it perfectly every single time:
- Measure and have all your ingredients ready to go before starting. This will make the process run smoothly, quickly, and easily.
- If you make your oat flour, ALWAYS sift it before measuring it. Homemade oat flour does not get as fine as store-bought, so to ensure it's fine, sift it. If it's not sifted, the texture of your cookies will not be correct. (Learn how to make oat flour)
- Measure your oat flour correctly. Too much will make your cookie dough too dry and very crumbly resulting in cookies that are also dry and crumbly. Please read my article about how to measure flour correctly. This tip also applies to all other ingredients, make sure to measure them accurately to get the best results. I highly recommend using a scale (this is the scale I own (Amazon Link) and my weight measurements.
- Don't add the candy canes to the tops of the cookies before they bake, or add them to the cookie dough (the pieces will melt as the cookies bake!), add them after they bake as directed in the recipe.
Looking for more Christmas treats? Be sure to look through all of my vegan gluten-free Christmas recipes for new ideas!
Tips for Success (continued)
- Sprinkle the candy cane pieces immediately after the cookies come out of the oven, they will still be hot, so the candy cane pieces will stick. If you wait too long, they won't stick and will roll off the cookies.
- Use a cookie scoop to scoop the cookie dough. This will result in uniform-sized cookies that bake evenly. Using a scoop also makes this step quicker and easier.
- Don't bake the cookies longer than the time stated in the recipe or skip the resting time. They will not look done when the baking time has ended, they'll be very soft and fragile and the time may seem too short, but they will finish off and firm up during the rest time. If overbaked, they will dry out.
- Read this post from top to bottom before you start. I’ve included a lot of tips and tricks so you get things right. Also read through the actual recipe before getting started.
- Follow the recipe exactly as it’s written for the very best results.
Recipe FAQ
Oats are naturally gluten-free, but they can become cross-contaminated with gluten during processing and even while growing in the fields. To make sure the oat flour and oats you are buying are gluten-free, look for certification on the package.
I don't keep peppermint oil on hand, so I have not tested it. If you do decide to experiment, keep in mind that peppermint oil is very strong, so only a few drops will be needed, use it sparingly so the peppermint flavour does not overpower the cookies.
If You Make This Recipe...
Let me know! You can do that by leaving me a comment and star rating below or by posting a picture on Instagram and tagging me so I can see it (I'm @delightfuladventures!).
And If You Like This Recipe...
Look through all of my vegan gluten-free Christmas cookies if you need more ideas for your cookie swap, holiday potluck, homemade gifting, or just for baking and enjoying at home, here are a few:
- Vegan Gluten-Free Gingerbread Cookies
- Vegan Gluten-Free Sugar Cookies
- Vegan Gluten-Free Molasses Cookies
- Vegan Gluten-Free Thumbprint Cookies
- Vegan Gluten-Free Thin Mint Cookies
- Vegan Gluten-Free Linzer Cookies
Vegan Chocolate Peppermint Cookies
Suggested Equipment:
Ingredients:
- 1 tablespoon ground flax seeds
- 3 tablespoons water
- 1 ½ cups (130g) oat flour (if you make your own oat flour, be sure to sift it, see note below)
- ½ cup (42g) Dutch-process cocoa powder (sifted)
- 1 teaspoon baking powder
- ¼ teaspoon salt
- ½ cup (113g) melted vegan butter
- ¾ cup (150g) brown sugar
- 1 teaspoon peppermint extract
- ½ teaspoon vanilla extract
- 1 cup (180g) chocolate chips
- 1-2 tablespoons (15g - 30g) crushed candy canes
Instructions:
- Preheat oven to 350°F (177°C).
- Prepare your baking sheet(s) by lining it with parchment paper (if needed).
- Prepare your flax egg by whisking together ground flax seeds and water. Set aside for at least 5 minutes to thicken.
- In a medium bowl, whisk together the oat flour, cocoa powder, baking powder, and salt. Set aside.
- In a large bowl, whisk the melted vegan butter, brown sugar, peppermint extract, vanilla extract, and flax egg together.
- Add dry ingredients to wet ingredients and mix until combined.
- Stir in chocolate chips until they have combined with the cookie dough.
- Using a medium-sized cookie scoop (or a tablespoon) scoop equal amounts of the cookie dough onto the cookie sheet(s). Leave enough space around each cookie, and flatten each cookie slightly, they will only spread a little as they bake. (See image above)
- Bake for 8 minutes, don't over bake! (see note below)
- Remove from the oven and let cookies sit on the cookie sheet for 5 minutes, while they are sitting, immediately sprinkle the tops of each cookie with crushed candy canes. This must be done immediately after they have been removed from the oven. Lightly press in any large pieces.
- After the resting time has passed, carefully transfer the cookies to a cooling rack. Cool almost fully before serving.
Recipe Notes:
- Before making this recipe, please read all of the helpful tips and FAQ above, as well as the notes below.
- The calorie count is based on 1 of 20 cookies, which is the amount you will get if you use a medium-sized cookie scoop to scoop them out (medium scoops are usually 1.5 tablespoons). If you scoop them with a tablespoon, you will end up with a few more cookies.
- If you make your own oat flour, be sure to sift it before using it for this recipe so none of the harder bits remain. Measure the correct amount needed for the recipe using the sifted oat flour. The oat flour needs to be fine for this recipe or the cookies will be too crumbly. If you buy oat flour, I recommend this one.
- This recipe will NOT work with coconut flour.
- If you want to use coconut oil instead of vegan butter, I recommend using refined coconut oil and not unrefined / virgin coconut oil. Unrefined coconut oil will give these cookies a coconut flavour that overpowers the peppermint flavour.
- Cookies may seem underbaked when you take them out of the oven because they will be very soft and delicate but they firm up as they cool. Don't skip the resting time or they will fall apart when handled.
- Make sure to sprinkle the crushed candy canes on top of the cookies immediately after the cookies have been taken out of the oven so the candy canes stick to the hot cookies, if you wait until they start cooling, the candy will roll off and not stick. lightly press in any large candy cane pieces so they stick.
- A range of crushed candy canes is given int he recipe above, if you prefer lots of candy canes on your cookies, use 2 tablespoons.
- Store your cookies for up to six days in an airtight container at room temperature.
- Freezing Baked Cookies: Freeze the cookies in single layers in a freezer bag or airtight container, with parchment paper separating each layer, for up to 2 months. Thaw them in the refrigerator or at room temperature.
- Freeze Cookie Dough for Baking Later: Follow steps 2-8 in the recipe (Don't forget to flatten them slightly), then place the cookie sheet in the freezer. Once completely frozen, place the cookie dough in an airtight, freezer-safe bag or container, with parchment paper separating each layer, and freeze for up to 2 months. When you’re ready to bake them, remove them from the freezer, place them on a prepared baking sheet, and bake for 10-11 minutes (no need to thaw them but if you do, just bake for 8 minutes). Do steps 10 and 11.
- The nutrition info listed below is based on one cookie made using the recipe as written. Nutrition info is only to be used as a rough guide. Click here to learn how nutrition info is calculated on this website.


Leave a Reply