This page may contain affiliate links. Click to learn more. As an Amazon Associate I earn from qualifying purchases.

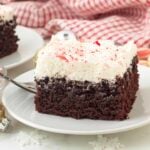
If you're looking for an irresistible vegan dessert for your holiday celebrations, how about this luscious vegan chocolate mint cake? Rich, chocolaty, and bursting with minty flavour, it's a treat everyone will love.
It’s topped with fluffy peppermint buttercream but can be enjoyed without frosting. Completely dairy-free, egg-free, and with a gluten-free option, this mouthwatering vegan Christmas cake can even be made as a layer cake! All the details are below.

Save This Recipe!
In a hurry? Drop your email below, and this recipe will be sent straight to your inbox for later. You'll also get fresh recipes every week! You can unsubscribe anytime.
Can you believe this website has been around for a decade? It went live on December 1st, 2014, and here we are, 10 years later!
To keep tradition, I'm sharing another chocolate mint recipe, this fluffy, moist vegan chocolate mint cake, to celebrate.
Chocolate mint is my favourite flavour combo, so early on, I started celebrating each year with a new recipe featuring those flavours, like vegan peppermint patties, vegan chocolate peppermint cookies, and vegan peppermint mocha! (Click this link to see all the other homemade vegan chocolate peppermint recipes I've shared over the years!).
Since 10 is a milestone, it had to be a cake, and it's a good one! Rich, chocolaty cake with subtle mint flavour and topped with a creamy peppermint frosting. It's a quick, easy, and impressive dessert to serve at any holiday gathering or meal. Everyone will love it!
Let's go through all the details you'll need to bake this amazingly simple chocolate peppermint cake, hopefully, it will become a new must-make on your annual holiday baking list.
Ingredients You'll Need

Ingredient and Substitution Notes
Flour - You will need all-purpose white flour.
For vegan gluten-free chocolate mint cake: Use Bob's Red Mill Gluten-Free 1-to-1 Baking Flour in the BLUE bag, the one with xanthan gum. Oat flour, almond flour, coconut flour or any other gluten-free flour on its own will NOT work, it must be this specific gluten-free flour blend to get the results I do. (Read all of my vegan gf baking tips.)
Sugar – I use organic cane sugar but you can use regular white sugar instead, just make sure it's vegan. I don't recommend using liquid sweeteners such as maple or agave syrup as a substitute since this will throw the balance of wet and dry ingredients off. I haven't tried substituting with any artificial sweeteners.
Oil - You'll need a neutral-flavoured oil such as refined avocado, safflower, or sunflower. Melted coconut oil can also be used, but ensure your other ingredients are at room temperature to prevent it from turning solid when you add it to the mix. I haven't tried using vegan butter in this recipe, and I haven't attempted an oil-free version.
Cocoa Powder - I use Dutch-process unsweetened cocoa powder in all of my recipes. Dutch-processed cocoa powder provides a rich chocolate flavour to baked treats. I have not tested this recipe with natural cocoa powder/cacao powder. If you are looking for an ethical cocoa powder brand, read my article "Is Cocoa Powder Vegan" to get a list of options.
Baking Powder and Baking Soda - Make sure these ingredients are fresh and active, they’re essential for the cake to rise properly and have the correct texture.
Vanilla Extract and Salt - Both will enhance the flavour of your cake, don't leave either of them out.
Vinegar - This is used to react with the baking soda to make air bubbles that will give the cake more lift while baking and not to worry, you won’t taste it in the cake. I use apple cider vinegar, but white vinegar can be used, too.
Hot Water - Using hot water helps to "bloom" the cocoa powder. Blooming is a fancy way of saying "enhance" the chocolate flavour to make it even deeper, richer, and chocolaty tasting.
Peppermint Extract - Make sure you are using "pure peppermint extract" and NOT spearmint extract. Spearmint is an entirely different flavour (it tastes like toothpaste!) that will give your cake an unpleasant taste.
Crushed Candy Canes (Optional) - Use them for sprinkling on top of the frosted cake to make it extra festive looking.
Vegan Peppermint Buttercream Frosting (Optional) - I like to frost this cake with my peppermint buttercream frosting but you can opt to go without frosting and dust with powdered sugar instead or you can use a different type of frosting. A drop or two of green food colouring/gel can be added to the frosting to make it light green if you'd like.
NOTE: Measuring flour accurately for any baking recipe is essential to getting the results you expect, no matter what type of flour you're using. Read this article: "How to Measure Flour Correctly" before you start.
How to Make It
(Note: I’ve outlined the step-by-step on how to make this recipe here, but find the full recipe, ingredients, and directions in the recipe card at the end of this post.)

Start by mixing the wet and dry ingredients in separate bowls, then combine them to create the batter, don't over-mix. You'll notice bubbles forming on the surface of the batter, this is caused by the reaction between the baking soda and the vinegar.

Transfer the batter to your prepared pan. Work quickly so the bubbles are still active and you don't lose out on the reaction.
Want more vegan cake recipes? How about vegan banana cake, vegan gingerbread cake, or this vegan gluten-free chocolate cake?

Bake and when it's done, carefully remove the pan from the oven. Let the cake rest in the pan for a few minutes, then remove it using the parchment overhang and place it on a wire rack.
While the cake cools, prepare the peppermint buttercream frosting and then refrigerate it until you're ready to use it.

Once fully cooled, frost the cake making the layer as thick or thin as you'd like. Save any leftovers for another recipe.
If you love sweet treats, browse these easy vegan dessert recipes for some more ideas!

Optional - Sprinkle crushed candy canes on top of the buttercream. Note that if the cake is stored in the refrigerator, the candy cane pieces will liquefy over time, so if you plan on storing the cake, keep that in mind.
TIP - Crushed candy canes can be purchased but you can also crush whole candy canes yourself with a food processor, a small coffee grinder, or by placing them in a freezer bag and crushing them with a rolling pin.

Carefully slice the cake into 9 or 12 squares and serve.
Storing and Freezing
Store your frosted cake at room temperature in an airtight container for up to 2 days. After two days place the container in the refrigerator where it will keep for up to another 3-4 days.
The vegan gluten-free version stays fresh for a little less time since it dries out quicker, so the faster the cake can be eaten, the better.
If you are not frosting the cake, it does not need to be refrigerated and can be kept in an airtight container at room temperature for 5-6 days.
Freezing
After the cake has completely cooled, don't slice or frost it. Instead, tightly wrap it with plastic wrap, then place it in an airtight container or freezer bag, and freeze it for a maximum of two months.
When you're ready to serve, allow it to thaw overnight in the refrigerator or at room temperature, and then top with the frosting.

Tips for Success
I tested both versions of this recipe several times to ensure they were perfect before sharing them with you. Before making this cake, please review the following list:
- Use the same flour I use. If you are making the gluten-free vegan version, remember that vegan gluten-free baking can be tricky because different flours and blends produce different results. The particular gf flour I use to make this cake works perfectly, so to duplicate that perfection, please use Bob’s Red Mill Gluten-Free 1-to-1 Baking Flour (in the BLUE bag!). If you don't need your cake to be gluten-free and you're making the vegan-only version, I have only tested with white all-purpose flour, so proceed with caution if you use a different type.
- Don’t over-mix if you are using all-purpose flour, over-mixing will make the cake turn out heavy and tough, it won't be soft and fluffy.
- Measure and have all your ingredients ready to go before starting. This will make the process run smoothly, quickly, and easily.
- Measure your ingredients correctly. I highly recommend using a scale (this is the one I have) and my weight measurements when making this recipe. Please read my article about how to measure flour correctly. This tip also applies to all other ingredients, make sure to measure them accurately to get the best results.

Tips for Success (continued)
- Sift your cocoa powder before adding it to the bowl. Cocoa powder is naturally lumpy and those lumps are not easy to break up once they've been mixed into the batter, so always sift.
- Make sure your baking powder and baking soda are fresh. These are important ingredients that make the cake rise. If they are not fresh, they won't work and the cake will be dense and gummy.
- Make sure the cake has FULLY cooled before frosting. Frosting it while it's still warm will cause the frosting to melt and not stick to the cake. Allow the cake to cool for AT LEAST 2 hours before frosting.
- Read this post from top to bottom before you start. I’ve included many tips and tricks to get things right. Also, read through the actual recipe before getting started.
- Follow the recipe exactly as it’s written for the very best results.
Need a few more Christmas recipe ideas? Have a look through all of these vegan Christmas recipes to find something new for your list.
Variations
- Make It a Layer Cake:
- Double the recipe and:
- use two square 8 x 8-inch pans to make a square layer cake, use the same baking time as specified in the recipe.
- use two 8-inch circle pans and bake for 23-25 minutes, or until a toothpick poked in the center of each cake comes out clean.
- Use two 9-inch circle pans and bake for 21 minutes, or until a toothpick poked in the center of each cake comes out clean.
- Double the recipe and:
- Make cupcakes instead of a cake:
- Follow my vegan gluten-free chocolate peppermint cupcakes recipe and if you don't need them to be gluten-free, use 1 and ½ cups (188g) of all-purpose flour instead of the gluten-free flour blend the recipe calls for.

If You Make This Recipe...
Let me know how your chocolate mint cake turned out by leaving a star rating and comment below or you can post a picture on Instagram and tag me so I can see it. I’m @delightfuladventures on Instagram.
If You Like This Recipe...
You may like these other vegan chocolate recipes that are all perfect for the holidays:
Fluffy Vegan Chocolate Mint Cake (with Peppermint Frosting)
Suggested Equipment:
Ingredients:
- 1 ½ cups (188g) all-purpose flour **please see important notes about flour and the gluten-free option below**
- ½ cup (42g) Dutch-process cocoa powder sifted
- 1 teaspoon baking powder
- ½ teaspoon baking soda
- ½ teaspoon salt
- 1 cup (200g) organic cane sugar (or white granulated sugar)
- 1 cup (240ml) hot water (boiled)
- ⅓ cup (80ml) oil
- 1 tablespoon (15ml) apple cider vinegar (or white vinegar)
- 2 teaspoons vanilla extract
- 2 teaspoons peppermint extract
For the Frosting:
- 1 recipe peppermint buttercream frosting
- 2 tablespoons crushed candy canes (optional)
Instructions:
- Preheat oven to 350° F (177° C).
- Line an 8" x 8" square baking pan with parchment paper and make an overhang on all sides so removing the cake will be easy, set aside.
- In a medium bowl, whisk together the flour, cocoa powder, baking powder, baking soda, and salt.
- In a small bowl, mix the sugar, hot water, oil, vinegar, vanilla extract, and peppermint extract, together until blended.
- Slowly add the wet mixture to the dry mixture and stir until combined. Mix until there aren't any lumps but don't over mix and get rid of all the bubbles forming from the reaction between the vinegar and baking soda.
- Using a rubber spatula, scrape the batter into the prepared baking pan, and spread it evenly.
- Bake for 21 minutes or until a toothpick inserted in the middle of the cake comes out clean. (Bake the vegan gluten-free version for 25 minutes)
- Remove from the oven and place the pan on a cooling rack. Let the pan sit for 10 minutes.
- After 10 minutes, using the parchment overhang, carefully remove the cake from the pan, and place it on a cooling rack. Cool completely before frosting.
- While the cake is cooling, prepare the peppermint buttercream frosting.
- Once fully cooled, frost the cake, making the layer as thick or thin as you'd like. Save any leftover frosting for another recipe.
- If using, sprinkle the crushed candy canes on top of the frosting.
- Slice the cake into 9 or 12 squares.
Recipe Notes:
- Please read all of the information above and below before making this recipe.
- If you are making the vegan gluten-free version, use 1 ½ cups (222g) of Bob’s Red Mill Gluten Free 1 to 1 Baking Flour (Amazon link) in the blue bag, NOT the red bag. It's important to know that different gluten-free flour blends use different ingredients and ratios, so results will always vary if you substitute. I have never used any other brand of flour to make this recipe other than the one mentioned above, so please know that your results may not be the same as mine if you substitute with another gluten-free flour blend. This recipe will NOT work with coconut flour or any other single gluten-free flour.
- The cup amount for both types of flour is the same but the weights are different because they have different properties and densities. If you are baking by weight, please take note of each weight and weigh your flour correctly.
- Make sure your baking powder and baking soda are fresh before using, these are very important ingredients that contribute to the cake rising properly.
- Organic cane sugar or granulated sugar works best for this recipe and works with the rest of the ingredients to give the cake its moistness and texture. Don't reduce the amount of sugar called for, substitute with a different type of sugar, or use a liquid sweetener.
- Storing Leftovers: Store your frosted cake at room temperature in an airtight container for up to 2 days. After two days place the container in the refrigerator where it will keep for up to another 3-4 days. The vegan gluten-free version stays fresh for a little less time since it dries out quicker, so the faster the cake can be eaten, the better. If you are not frosting the cake, it does not need to be refrigerated and can be kept in an airtight container at room temperature for 5-6 days.
- Freezing: Once fully cooled, don't frost or slice it, instead, wrap it tightly with plastic wrap so it's airtight, then place it in an airtight container or freezer bag, and freeze it for up to two months. When you're ready to serve, thaw in the refrigerator overnight or at room temperature, then frost.
- The nutrition info listed below is based on 1 of 9 servings with the recipe made as written using all-purpose flour and no frosting. The cake made with gluten-free flour has a calorie count of 253 per serving. Info is only to be used as a rough guide. Click to learn how nutrition info is calculated on this website.


Did You Make This Recipe or Have a Question About It?