This page may contain affiliate links. Click to learn more. As an Amazon Associate I earn from qualifying purchases.
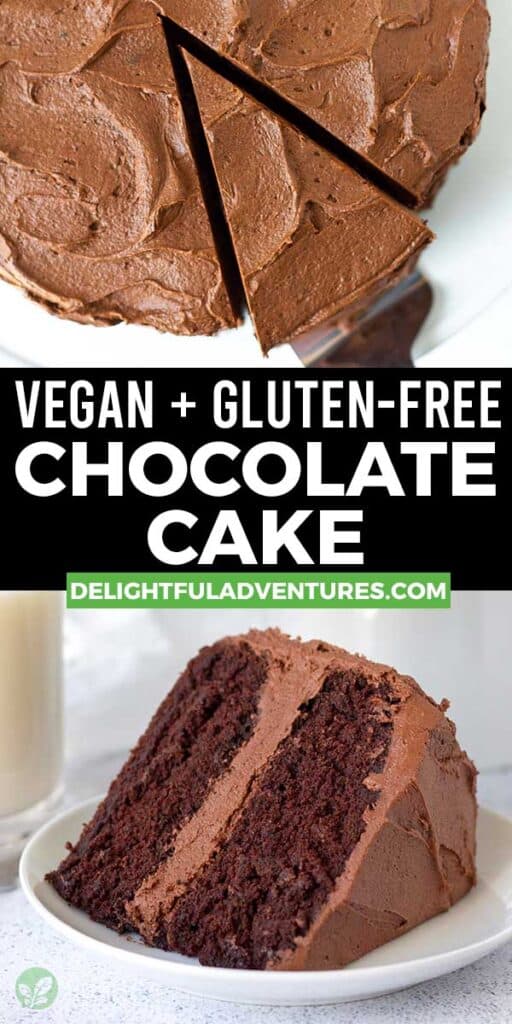
A rich, delicious vegan gluten-free chocolate cake is perfect for your next celebration! It’s quick and easy to make, plus, it’s soft, moist, tender, and covered with the best vegan chocolate buttercream.
This decadent dessert is also dairy-free, egg-free, and perfect for any chocolate lover.

Save This Recipe!
In a hurry? Drop your email below, and this recipe will be sent straight to your inbox for later. You'll also get fresh recipes every week! You can unsubscribe anytime.
I'm so happy to be finally sharing this recipe with you. I thought it may have been ready to share several months ago, but there was something about that recipe that I wasn't 100% satisfied with.
So, I went back to the drawing board, made a few changes and I think this is now the BEST vegan gluten-free chocolate cake I've ever had. I hope you'll agree.
It's rich, decadent, soft, fluffy, and moist. You know, all of the things that chocolate cake should be!
I like to use vegan chocolate buttercream to frost and add between the layers, but you can use any vegan buttercream, I have several suggestions below.
It's a very easy and quick cake to make and it's the perfect vegan gluten-free birthday cake (or anniversary cake, baby shower, Valentine's Day, Mother's Day, Father's Day, graduation, ANY milestone or special occasion...or just because you're craving chocolate cake).
(If you prefer cupcakes over a layer cake, make my vegan gluten-free chocolate cupcakes instead, and if you're looking for a chocolate cake that's vegan and not gluten-free, take a look at my moist vegan chocolate sheet cake.)
Now let's talk about everything you need to know so you can make this dreamy chocolate dessert, too!
Ingredients You'll Need
When you decide to make an impressive dessert like this chocolate cake, you may think that the ingredient list is going to be long, but it isn't.
All you need is 11 basic ingredients. I've listed them below along with info on what you can and cannot substitute.

Ingredient and Substitution Notes
Gluten-Free Flour Blend - This recipe is made with a gluten-free flour blend, Bob’s Red Mill Gluten-Free 1 to 1 Baking Flour to be specific, the one in the BLUE bag with xanthan gum.
I have not tested with any other gluten-free flour other than this one, so I’m not sure how others would work. With vegan gluten-free baking, it’s always important to use the same flour the recipe calls for to get the expected results.
This recipe will not work with any single gluten-free flour, such as coconut, almond, rice, etc. It must be the blend mentioned above, for the best and intended results.
NOTE: When baking, measuring your flour accurately is so important to get the best results. Check out my article about how to measure flour correctly before you start.
Oat Flour - I make this chocolate cake with oat flour, it's the ingredient that makes it light, tender, and fluffy. If you cannot use oat flour, you can replace it with more of the gluten-free flour blend, but if you do that, the cake will be slightly on the dense side. It will still be a good cake, but to achieve the lighter texture you expect from a cake, oat flour is needed.
You can use either store-bought oat flour or homemade oat flour. If you make it yourself, make sure to sift it before measuring or weighing it. Homemade oat flour does not get as fine as store-bought which is why sifting is necessary.
If it's not sifted, the texture of your cake will not be correct. Also, make sure to buy certified gluten-free oat flour (or certified gluten-free oats for homemade flour) so the recipe is 100% gluten-free.
I have not tested with another flour in place of the oat flour, if I test any others, I will provide an update.
Sugar - I use organic cane sugar in this recipe, but white sugar can also be used. Not all sugar is vegan, some are processed using animal bone char, so to be sure that yours is, buy an organic brand (organic sugar is not processed using bone char) or one that is labelled as vegan.
I haven't made this recipe with any other types of sugar like coconut sugar or brown sugar and I have also not tried making it with a liquid sweetener (like maple syrup or agave) and would not recommend it because other ingredients' amounts will have to be altered. I have not tried using any sugar alternatives to make it sugar-free, so I'm not sure how they would work.
Don't reduce the amount of sugar in the recipe, it plays an important role in the cake's texture.
Cocoa Powder - I use Dutch-process unsweetened cocoa powder in all of my recipes, so it's what I use in this one. Dutch-processed cocoa powder provides a rich chocolate flavour to any recipe you use it in. I have not tested this recipe with natural cocoa powder.
If you are looking for an ethical cocoa powder brand, read my article "Is Cocoa Powder Vegan" to get a list of options.
Oil - Any type of neutral-flavoured vegetable oil can be used such as safflower or sunflower. Vegan butter is not recommended as it will weigh the cake down and the texture will not be as moist since butter is roughly 20% water and oil is 100% oil. The water in the vegan butter will evaporate during baking and affect the cake's texture.
Hot Water - This is a chocolate cake recipe without milk, instead, hot water is used. Boil the water, don't use hot tap water. The water needs to be boiling hot because it helps to "bloom" the cocoa powder (a fancy way of saying "enhance" the chocolate flavour to make it even deeper, richer, and chocolaty tasting).
To boost the chocolate flavour, even more, you can use one cup of hot water and one cup of hot brewed coffee. Don't worry, the coffee flavour will not come through in the finished cake.
Vinegar - A little vinegar is needed to create a reaction with the baking soda so the cake rises nicely. You can use either apple cider vinegar or white vinegar.
Baking Powder and Baking Soda - These two ingredients are essential to the recipe so the cakes rise properly and have the best texture, they cannot be left out or substituted for one another. Make sure they are both fresh.
Vanilla and Salt - Both of these ingredients are needed to enhance the flavour of the cake.
Are you new to vegan gluten-free baking? If so, be sure to read all of my vegan gluten-free baking tips!
How to Make It
(Note: I’ve outlined the step-by-step on how to make this recipe here, but find the full recipe, ingredients, and directions in the recipe card at the end of this post.)
This cake couldn't be easier to make, just a few steps and you're on your way to fixing your chocolate cravings!
1. Mix the dry ingredients and set aside.
2. Mix the wet ingredients.
3. Combine the wet and dry ingredients.
4. Mix well until everything has combined and no lumps or pockets of the dry mixture are left.

Next, divide the cake batter into two cake pans and bake!
You'll know they are ready when a cake tester or a toothpick inserted into the center of each cake comes out clean.
After the cakes have finished baking, remove them from the oven and let them sit in the pans for 10 minutes before removing them and placing them on a cooling rack to fully cool before decorating.
You'll notice that these cakes come out of the oven with some cracks on top, but that's okay, no one will know once they have been frosted!

Decorating It
Once the cakes have cooled, they're ready for decorating. You can decorate your cake as plain or as extravagant as you want. I usually keep it simple, like in the pictures. I'm still working on my cake decorating skills!
I usually frost a chocolate cake with my homemade vegan chocolate frosting, but there are so many other choices you have, so chocolate, although delicious, is not your only option. Any of the following would work well:
Depending on how much buttercream you like on your cake, you can double the buttercream recipes for a thicker more generous layer inside and out or make the buttercream recipe as-is for less buttercream.
You can also get fancy with piping and decorations and you can decorate your cake with sprinkles. Find a list of vegan sprinkles to look for in this article: "Are Sprinkles Vegan?"
TIP: If you're new to cake decorating, I highly recommend this inexpensive cupcake decorating kit (Amazon Link) that comes with four of the most popular decorating tips as well as eight disposable decorating bags. I also recommend adding a 12" reusable piping bag to your collection.

TIP: There's no better partner for cake than ice cream! This cake pairs perfectly with vegan chocolate ice cream and vegan vanilla ice cream.
Adding a Fruit Filling
If you'd like to add a fruit filling in between the cake layers, try one of the following:
Find more info and instructions about adding a fruit layer to your cakes in this video: "How to Assemble and Fill a Cake."
Storing and Freezing
Store your leftover frosted cake covered at room temperature for up to 2 days. After that, place the covered cake in the refrigerator for another 2-3 days. It will begin to dry out once placed in the fridge, so don't let it sit in there too long.
Freezing
You can freeze fully cooled unfrosted cakes by individually wrapping them tightly in plastic wrap and then storing them in freezer bags or an airtight, freezer-safe container for up to two months.
Defrost at room temperature when you're ready to decorate.

Tips for Success
- Measure and have all your ingredients ready to go before starting. This will make the process run smoothly, quickly, and easily.
- Measure your ingredients correctly. I highly recommend using a scale and my weight measurements when making this recipe. If you don’t have a scale, lightly spoon the flour into your measuring cup until it is overflowing and then drag the flat edge of a butter knife across the top to level it off. (NEVER dunk the measuring cup into the flour to fill your measuring cup because this will guarantee an incorrect measurement of up to 1.5x more flour and a recipe fail.) Learn more about how to measure flour correctly.
- Use the same flours I use. Baking vegan gluten-free can be tricky because different flours produce different results. These two particular flours work together perfectly for this recipe, so to duplicate that perfection, please use Bob’s Red Mill 1-to-1 Gluten-Free Flour (in the BLUE bag!) along with oat flour.
- If you make your oat flour, ALWAYS sift it before measuring it and adding it to the recipe. Homemade oat flour does not get as fine as store-bought, so to ensure it's fine, sift it. If it's not sifted, the texture of your cake will not be correct. (Learn how to make oat flour)
- Always sift your cocoa powder to get rid of the lumps. The hot water will help to dissolve them, but to be safe, it's best to give it a good sift before adding it to the mixing bowl.
- Make sure your baking powder and baking soda are fresh. These are important ingredients that make the cakes rise and become fluffy. If they are not fresh, your cakes will turn out dense and gummy.
- Don't overbake! Your cakes will be dry and crumbly if you bake them too long.
- Read this post from top to bottom before you start. I’ve included many tips and tricks to get things right. Also, read through the actual recipe before getting started.
- Follow the recipe exactly as it’s written for the very best results.
Want cupcakes instead of cake? Make my vegan gluten-free chocolate cupcakes recipe!
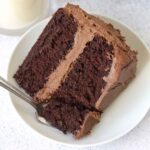
What's the Texture Like?
Moist, soft, and fluffy! If you are able, have a look at the following image to see.
But to get this texture, you must follow the recipe exactly as it’s written. Any substitutions or changes, and you run the risk of your cake not turning out as expected.

Are you new to vegan gluten-free baking? If so, be sure to read all of my vegan gluten-free baking tips!
If You Make This Recipe
Tell me about it! Did you make it just because you were craving chocolate? Or did you make it for a celebration? Please leave me a star rating and comment below telling me how your delicious cake turned out. You can also post a picture on Instagram and tag me so I can see it. (I'm @delightfuladventures on Instagram.)
And If You Like This Recipe
You may also like these other vegan gluten-free chocolate recipes:
Vegan Gluten-Free Chocolate Cake
Suggested Equipment:
Ingredients:
- 2 cups (296g) gluten free flour **see important note about flour below**
- 1 cup oat flour
- 1 cup (84g) Dutch-process cocoa powder sifted
- 2 teaspoons baking powder
- 1 teaspoon baking soda
- ½ teaspoon salt
- 1 ½ cups(300g) cane sugar (or granulated sugar)
- 2 cups (480ml) hot water (boiled)
- ⅔ cups (160ml) oil
- 2 tablespoons (30ml) vanilla extract
- 2 tablespoons (30ml) apple cider vinegar (or white vinegar)
For the Frosting:
- 1 recipe vegan chocolate buttercream frosting (double the recipe for a more generous layer of buttercream)
Instructions:
- Preheat oven to 350° F (177° C).
- Grease or line your 8" cake pans with parchment paper circles and set aside.
- In a large bowl, whisk together the gluten-free flour, oat flour, cocoa powder, baking powder, baking soda, and salt.
- In a medium bowl, mix the sugar, hot water, oil, vanilla extract, and vinegar until blended.
- Slowly add the wet mixture to the dry mixture and stir until combined. Mix until there aren't any lumps but don't over mix and get rid of all the bubbles forming from the reaction between the vinegar and baking soda.
- Divide the batter between the two cake pans.
- Bake for 25 minutes or until a toothpick inserted in the middle of the cakes come out clean.
- Remove the cakes from the oven and allow them to cool in the pans for 10 minutes, then carefully remove them, and place them onto a cooling rack.
- Allow cakes to fully cool before decorating.
- Prepare 1 batch of this vegan chocolate buttercream frosting then frost the top of the first cake, place the second cake on top, then frost the top of the cake and the sides. Add sprinkles, pipe frosting decorations, or add other garnishes as desired. Two batches of the buttercream can be made for a more generous layer of buttercream.
Recipe Notes:
- Please read all of the information above and below before making this recipe.
- It’s important to know that different gluten-free flour blends use different ingredients and ratios, so results may vary if you substitute. I have never used any other brand of gf flour to make this recipe (other than Bob’s Red Mill Gluten Free 1 to 1 Baking Flour (Amazon link) in the blue package, NOT the red package), so please know that your results may not be the same as mine if you substitute with another gluten-free flour blend. The weight listed above is for this specific brand of flour.
- This recipe will NOT work with coconut flour, almond flour, or any other single gluten-free flour, it must be made with the blend listed above and oat flour.
- If you cannot use oat flour, you can replace it with more of the gluten-free flour blend, but if you do that, the cake will be slightly on the dense side. It will still be a good cake, but to achieve the lighter texture you expect from a cake, oat flour is needed.
- This recipe uses two 8-inch round cake pans but you can use 9-inch pans as well. Your cakes will be thinner and shorter and will require less baking time, though. Check on them around the 20-minute mark.
- Make sure your baking powder and baking soda are fresh before using, these are very important ingredients that contribute to the cakes rising properly.
- Any type of neutral-flavoured oil can be used in this recipe, such as sunflower or safflower.
- Organic cane sugar or granulated sugar works best for this recipe and works with the rest of the ingredients to give the cakes their moistness and texture. Don't reduce the amount of sugar called for, substitute with a different type of sugar, or use a liquid sweetener.
- Boil the hot water don't use hot tap water.
- Store leftovers covered at room temperature away from heat sources and direct sunlight for up to 2 days. After that, place the cake in the refrigerator, in a cake storage container, for another 2-3 days. When refrigerating, you can also slice the cake and place the slices in an airtight container or individually wrap them before storing. The cake will begin to dry out once placed in the fridge, so don't let it sit in there for too long.
- You can freeze fully cooled unfrosted cakes by individually wrapping them tightly in plastic wrap and then storing them in freezer bags or an airtight, freezer-safe container for up to two months. Defrost at room temperature.
- Nutrition info is based on 1 of 12 slices of cake that has been frosted with 1 batch of vegan chocolate buttercream frosting. Nutrition info is only to be used as a rough guide. Click here to learn how nutrition info is calculated on this website.


Sandra says
Can I make this in a Bundt pan?
Gwen Leron says
Hi Sandra, baking it in a bundt pan should be fine, however, I have not tested it, so I am unsure of timing so you will have to experiment with that. A very rough guideline is that bundt cakes take around 45 minutes but I would start checking this cake for doneness around the 35 minute mark. If you try it, please come back and let me know how things go!
Alex Clegg says
Made this cake for my husband’s birthday. Made with regular self raising flour and it was absolutely delicious, that best vegan cake I’ve ever made, and I’ve made a few! Soft and full of flavour. Everyone loved it.
Gwen Leron says
I'm so glad you and your husband loved the cake, Alex! It's a favourite in my home too. Thanks so much for coming back to share your review and your kind words, I really appreciate it!
Rony says
hello dear,
in your ingredients, you mentioned :
2 cups (296g) gluten free flour
later you said: 1 cup (84g) Dutch-process cocoa powder sifted
and again : 2 cups (480ml) hot water
am confused is 1 cup equivalent to 148g or 1 cup = 84g
Thank you
Gwen Leron says
Hi Rony! I understand your confusion! All ingredients have different densities which will result in different weights, even though they may have the same volume.
So for example, if you measure 1 cup of feathers and 1 cup of marbles, they have the same volume (1 cup), but if you were to weigh that same cup of feathers and the same cup of marbles, the marbles would be heavier.
The same applies to the ingredients in this (and all) recipes.
1 cup of this particular gluten-free flour (and note that all gluten-free flours weigh differently) weighs 148g while 1 cup of cocoa powder, which has a lower density, only weighs 84g.
I hope this explanation makes sense, please let me know if you need any further clarification on anything if you do decide to make the recipe. Take care!
Marsha says
I’ve made this cake several times for birthday parties and everyone loves it. I used it for a Mexican-themed birthday party by adding 1/2 tsp cinnamon and 1/4 tsp cayenne pepper to the cake and to the frosting making it a Mexican Hot Chocolate Cake!
Gwen Leron says
I'm happy to hear this, Marsha, I'm glad you've been enjoying the recipe and I love your modification! Thanks so much for coming back to leave your rating and comment, I appreciate it very much.
Asia says
Perfect cake!!! I also added orange juice to the frosing and it turned out amazing! Highly reccomend this recipe;)
Gwen Leron says
I'm so glad you enjoyed it, Asia! I love the chocolate orange/twist for the frosting, delicious. Enjoy what you have left!
Tokie Williams says
My niece and I made this cake today. It was our first time making a GF vegan cake from scratch. To my surprise, it came out pretty good considering we made a few substitutions. We used coconut sugar and AP GF flour from the local farmers market. The cake was moist and the vegan buttercream frosting was perfection. My niece watches “Nailed It” and gave me some pointers…lol. I should have listened to her and added 1/2 cup more of the coconut sugar to sweeten the cake batter a bit more. All that aside, this is a keeper and we will definitely make this again. Can’t wait until you perfect your recipe for the vanilla version. 😉
Gwen Leron says
I'm glad you came across the recipe and tried it, Tokie, and I'm also happy it worked well with your subs. Switching the flour is always a risk, but that's great news that it worked well for you! I hope you and your niece enjoy what's left. And yes, I'm still working on that vanilla version, it seems like it would be an easy recipe but it's proving to be the opposite 🙂 I'll get it soon! Thanks so much for your kind words!