This page may contain affiliate links. Click to learn more. As an Amazon Associate I earn from qualifying purchases.
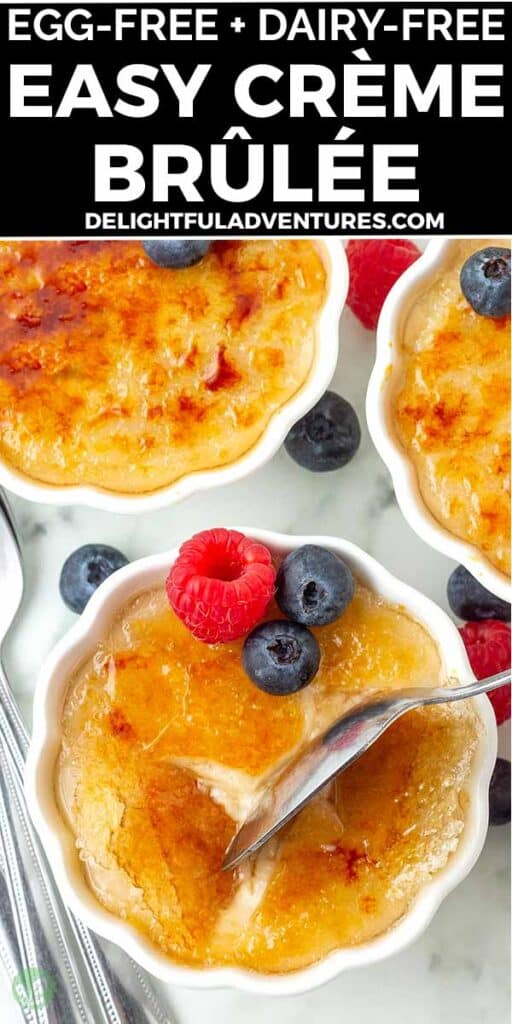
A divine classic French dessert made vegan! It’s rich, creamy, no-bake vegan crème brûlée and it’s the perfect vegan dessert to serve after any meal.
This decadent dessert is homemade, plant-based, and calls for just six ingredients. It's also gluten-free, dairy-free, and egg-free! Just like the classic, it has golden-brown caramelized sugar on top that you’ll love cracking to reveal the rich vanilla custard beneath.

Save This Recipe!
In a hurry? Drop your email below, and this recipe will be sent straight to your inbox for later. You'll also get fresh recipes every week! You can unsubscribe anytime.
If you thought this traditional dessert couldn't be made eggless and without dairy, you're in for a treat because yes, you CAN make vegan crème brûlée and it's not as difficult as you may think!
If you aren't familiar with this treat, it's a 2-layer dessert. The bottom layer is a rich, silky vanilla custard and the top is a thin layer of golden-brown caramelized sugar that's so satisfying to crack with your spoon. Put together, the two layers contrast each other in taste and texture making it the perfect mouth-watering, indulgent dessert.
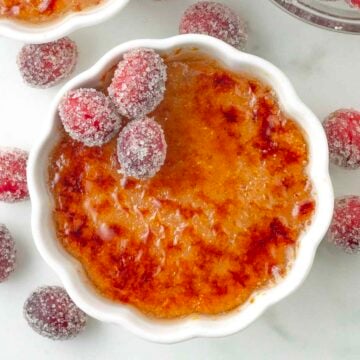
It's impressive and fancy enough to serve on special occasions, holidays, or dinner parties, and simple enough to make and serve on any regular day, just because. (If you want to make this dessert during the fall, you also have my vegan pumpkin crème brûlée as an option!)
If you love creamy vegan desserts that are quick and easy to make and have no baking involved, then you'll also like these:
- Vegan Chocolate Pudding
- Vegan Vanilla Pudding
- Vegan Butterscotch Pudding
- Vegan Sweet Potato Pudding
- Vegan Pumpkin Pudding
- Chocolate Avocado Pudding
In case you are wondering, "crème brûlée" is French and translates to "burnt cream."
Ingredients You'll Need
Can you believe that all you need to make this elegant dessert is six simple ingredients? It's true!
I recommend making the recipe exactly as written but I've included info about each ingredient and substitution information below.

Ingredient and Substitution Notes
Unsweetened Vegan Heavy Cream or Vegan Whipping Cream - Traditional crème brûlée is made with heavy cream but this is a dairy-free recipe, so you will need to use vegan heavy cream (or whipping cream) which is the vegan alternative to heavy cream. Silk, Country Crock, Becel, Califia Farms, and Violife are just a few brands that make it.
If you can't find any of these brands, you can use canned full fat coconut milk or lite coconut milk, but your crème brûlée will have a coconut flavour. You can also use a dairy-free barista blend milk instead. Make sure that what you use does not contain sugar or any flavours so you are in full control.
Dairy-Free Milk - A mix of thicker vegan cream and thinner plant milk is used to create the perfect velvety custard texture. Any plant milk will work (almond milk, oat milk, soy milk, etc.), just make sure it's unsweetened and unflavored and does not have a strong taste.
Cornstarch - Since this is made without egg yolks, this is the ingredient that thickens the custard, without it, your dessert will not thicken so it cannot be left out. If you want to make your vegan crème brûlée without cornstarch, arrowroot starch (also referred to as arrowroot flour or arrowroot powder) can be used instead.
Sugar - I use organic cane sugar in this recipe for the custard base and for caramelizing. White sugar can also be used, but make sure it's vegan. I haven't made this recipe with any other types of sugar (like coconut sugar or brown sugar), a liquid sweetener (like maple syrup or agave), or any sugar alternatives to make it sugar-free, so I'm not sure how they would work.
Vanilla - This ingredient is essential. Vanilla bean paste can be used for an even stronger vanilla flavour or you can also use a vanilla pod.
Salt - Just a little is needed to balance the flavour and sweetness.
Vegan Butter (Optional!) - Whisking in a little vegan butter at the end of the cooking time will result in a creamier custard. This is an optional ingredient so it can be omitted and the result will still be perfect.
If you choose to add vegan butter, either salted or unsalted will work fine.
How to Make It
(Note: I’ve outlined the step-by-step on how to make this recipe here, but find the full recipe, ingredients, and directions in the recipe card at the end of this post.)
1. Add the dry ingredients to a medium saucepan.
2. Whisk them together, making sure there are no lumps before moving on to the next step.

3. Slowly whisk in the dairy-free heavy cream and the dairy-free milk.
4. Whisk everything together. Use a spoon to scrape around the corners of the pot to make sure no dry spots remain. Place the pot on the stove over medium-high heat and whisk continuously until it has thickened.
You don't want the mixture to boil, but it will start to bubble towards the end of the cooking time. If it does start to boil, lower the heat.

5. Once the custard has thickened, remove it from the heat.

6. Whisk in the vanilla and if you are using it, the vegan butter.
Pour the custard into the ramekins and allow it to cool for about 15 minutes.
You must make sure to only use ceramic ramekins or heat-safe glass dishes when making crème brûlée. What you use needs to be able to handle high heat since it will come into contact with the flame while the sugar is being caramelized.
Once the 15 minutes have passed, place and lightly press a small piece of plastic wrap directly on top of each custard so the surface is fully covered. This will prevent a thickened layer of custard from forming on top as they chill. Refrigerate for at least 4 hours and up to 3 days.

An Essential Tool: The Kitchen Torch
I highly recommend a kitchen torch (also referred to as blow torch or brûlée torch) for this step (this is the kitchen torch I own).
Some recipes will instruct to caramelize the sugar by using the oven broiler, but I did not get consistent results and the custard became too warm, so I don't recommend this method.
A kitchen torch will caramelize the sugar evenly and quickly and the custard will not heat up which is a good thing since crème brûlée is meant to be served cold.
Caramelizing the Sugar
After the chilling time has passed, remove the plastic and sprinkle granulated sugar on top of the custard so the entire surface is covered in a thin layer all the way to the edges.
The layer should be thin, but not so thin that you can see the custard underneath
If you use too much sugar, it will start to burn before it has fully caramelized and if you use too little sugar it will not caramelize and just melt into the custard.
Use your kitchen torch to caramelize the sugar and create the classic crisp, sugary shell. (All the details on how to do this are in the recipe below). Repeat with each dessert.
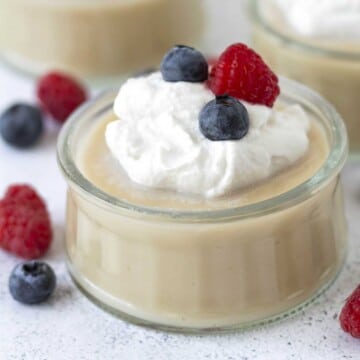
After caramelizing the sugar, let the ramekins rest for a few minutes before handling, the rims will be very hot from the flame. After a few minutes, serve immediately just as it is or top with fresh berries.

Making Ahead and Storing Leftovers
It's important to know that once the sugar has been caramelized, the dessert needs to be served right away or the sugar will soften and melt. Do not torch the sugar until you are ready to serve and do not refrigerate after you have caramelized the sugar.
The creamy custard can be made ahead and stored in the refrigerator for 3-4 days.
Since this dessert contains cornstarch, it cannot be frozen because the texture will change and not be very pleasant after it thaws.
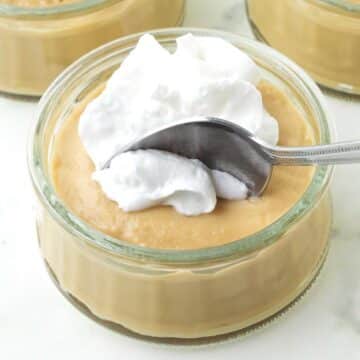
TIP: A kitchen torch gives the best caramelization. Broiling in the oven is not ideal since it's inconsistent and overheats the custard. No torch? Skip the caramelized sugar topping and enjoy the vanilla custard with fresh fruit, berries, or non dairy whipped cream. It's still delicious this way!
Tips for Success
- Measure and have all your ingredients ready to go before starting. This will make the process run smoothly, quickly, and easily.
- Measure your ingredients correctly. I highly recommend using a scale (this is the one I have) and my weight measurements when making this recipe.
- Cornstarch can be difficult to measure properly since it clumps up, so I highly recommend using a scale especially for this ingredient, if you don't have one, use the scoop and level method outlined in my article about how to measure flour the correct way. Too much or too little cornstarch will result in custard that is way too thick or too thin. It can also cause the custard to taste like cornstarch.
- Make sure to use unsweetened, unflavoured milk and vegan heavy cream so you have complete control over the sweetness and flavour.
- Don't let it boil. This custard only requires a light simmer to thicken, boiling is an indicator that the heat is too high. It will start to bubble when it's almost done, and that's okay, just as long as it isn't bubbling for the entire cook time, it can burn easily.
- Cook it for the proper amount of time. If it's not cooked long enough, the cornstarch will not fully dissolve so it can do its job of thickening the custard properly. This will also cause it to taste like cornstarch.

Tips for Success (continued)
- Make sure to whisk constantly during the cooking time. This is to ensure no lumps form and that it doesn't stick to the bottom of the pot. If lumps do form, it's very hard to get rid of them, so keep whisking!
- If there are lumps in the custard and whisking is not helping, run the custard through a sieve after it has finished cooking.
- Don't skip the chilling time. The custard will be thick after cooking, but it will continue to thicken when it chills until it reaches the perfect consistency.
- Only use ceramic ramekins or heat-safe glass dishes for your crème brûlée. You need to use something that can handle high heat since it will come into contact with the flame while the sugar is being caramelized.
- Keep the torch moving when caramelizing the sugar. Keeping it in one spot for too long will burn the sugar and make it dark and bitter.
- After caramelizing the sugar, serve right away. The sugar will start to melt and will no longer be hard the longer it sits.
- Read this post from top to bottom before you start. It's not difficult to make but I’ve included a lot of tips and tricks I've gathered while extensively testing this recipe, things you may not think of. Also, read through the full recipe before getting started.
- Follow the recipe exactly as it’s written for the very best results.
Want more decadent desserts? Have a look through all of my vegan dessert recipes for some more ideas!

If You Make This Recipe...
Please tell me about it! Leave a comment and star rating below or you can post a picture on Instagram and tag me so I can see it. (I’m @delightfuladventures on Instagram!)
If You Like This Recipe...
You may like these other easy vegan dessert recipes:

Vegan Crème Brûlée
Suggested Equipment:
Ingredients:
- ⅓ cup (67g) granulated sugar
- 3 tablespoons (24g) cornstarch (arrowroot starch can also be used, see note below)
- ⅛ teaspoon salt
- 1 ¼ cups (300ml) unsweetened vegan heavy cream or vegan whipping cream (see note below)
- ¾ cup (180ml) unsweetened dairy-free milk (see note below)
- 1 tablespoon vanilla extract
- 2 tablespoons (28g) unsalted vegan butter (optional, see note below)
- 6-8 teaspoons granulated sugar (for caramelizing the tops, adjust as needed, see note below)
Instructions:
- Add the sugar, cornstarch, and salt to a medium saucepan. Whisk until combined and no lumps remain. You may need to break up any lumps with the back of a spoon.
- Slowly whisk in the dairy-free heavy cream and dairy-free milk until combined with the dry mixture. Scrape around the corners of the pot with a spoon to be sure no dry ingredients remain.
- Place pot on medium-high heat and continuously whisk until mixture has thickened. It will start to thicken around the 4½ - 5 minute mark but cook for a full 6 minutes. When finished, it will be thick enough to coat a spoon. (See images above)
- Remove the pot from the heat and whisk in vanilla and if using, the vegan butter.
- Evenly divide the custard into individual 4oz ceramic ramekins. Allow the ramekins to sit for 15 minutes to cool slightly.
- Place plastic wrap and lightly press it directly on the surface of each custard and carefully place them in the refrigerator. Allow them to chill for at least 4 hours to set.
- Remove from refrigerator and remove plastic wrap. Evenly sprinkle 1 ½ - 2 teaspoons of sugar on top of each dessert ensuring that the entire surface has been covered all the way to the edges.
- Turn your kitchen torch on and hold the flame roughly 1-2 inches above the sugar. Using a circular motion, move the flame across the entire surface of the dessert. Don't stay too long in one area or the sugar will burn, move away as the sugar bubbles and turns a golden colour. Continue until all of the sugar has melted and has completely caramelized.
- Let the desserts sit for a few minutes before handling, the rims of the ramekins will be very hot. Serve right away as-is or top with fresh berries.
Recipe Notes:
- Please read all of the information above, as well as the notes below before making this recipe.
- This recipe makes 2 cups of custard in total. Divide into 4 ramekins for ½ cup servings or you can divide it between 5 or 6 small ramekins for smaller servings.
- Use an unsweetened vegan heavy cream or vegan whipping cream that is meant to be a substitute for regular heavy cream or whipping cream. Silk, Country Crock, Becel, Califia Farms, and Violife are just a few brands that make vegan heavy cream. If you can't find any of these, you can use canned coconut milk (either light or full fat, shake it well!), but your dessert will have a coconut flavour, more if full fat is used, a little less if lite is used. You can also use an unsweetened barista blend milk but note that your crème brûlée will not be as thick and creamy.
- Any type of unsweetened non-dairy milk can be used but make sure to use unsweetened, unflavoured milk so you have full control over the sweetness and flavour.
- If you want to make your crème brûlée without cornstarch, arrowroot starch (also referred to as arrowroot flour or arrowroot powder) can be used instead.
- You don't want the mixture to boil, but it will start to bubble towards the end of the cooking time. It will take roughly 6 minutes to thicken properly. No noticeable thickening will happen until the last 2 minutes or so, but keep whisking!
- The vegan butter is optional however, adding it will result in a richer, and even creamier crème brûlée.
- If you are using a wider ramekin than the ones in the picture, you will need more sugar to cover the entire surface of the dessert before torching it. If you are using something smaller, use less.
- The custard can be made ahead and stored in the refrigerator for up to 3-4 days.
- Do not torch the sugar until you are ready to serve and do not refrigerate after you have caramelized the sugar.
- The nutrition info listed below is for 1 of 4 servings (each serving is ½ cup) with the recipe made as written using silk heavy whipping cream, unsweetened unflavored almond milk, and no vegan butter. Nutritional data is only to be used as a rough guide. Click here for more info on how nutrition info on this website is determined.

Laurie says
I made this for a dinner party where one of the guests is gluten and dairy free. I tried other recipes and this was by far the best. Smooth, creamy and vanilla-y it hits all the notes! Thank you!!
Gwen Leron says
You're so welcome, Laurie! I'm glad everyone like it. Thanks for giving it a try and for coming back with your kind review, I appreciate it!
Eric says
Thanks for the recipe. Could I broil the ramekins in the oven to crystallize the sugar? I don't have a torch.
Gwen Leron says
Hi Eric, I wrote about this a little in the post above. I did test broiling them in the oven to caramelize the sugar but my results were not good and consistent, so I did not include info on how to use the oven for this step. I found that the custard would warm up too much and sometimes the sugar did not caramelize well. I highly recommend getting a torch if you can for the very best results.