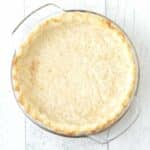
How to Blind Bake a Pie Crust
Learn how to blind bake a pie crust in this step-by-step filled with lots of tips and tricks to ensure you end up with a perfectly baked flaky crust for all of your homemade sweet and savoury pies (like quiche, meringue pies, custard pies, and more!). Learning how to pre-bake a pie crust the correct way is essential to avoid a pie crust that’s soggy, shrinks, bubbles, and/or slumps.
Servings: 8
Ingredients
- 1 pre-made pie dough (see note below)
Instructions
This method starts with premade pie dough that has already been rolled and placed in a pie dish with the edges crimped or fluted. Use either my vegan pie crust or my vegan gluten-free pie crust or another recipe you prefer.
- Dock the pie crust by poking a fork into the bottom of the pie crust. Continue until the crust has fork marks throughout.
- Place the pie dish in the refrigerator for AT LEAST 1 hour so it can chill before baking.
- Before the chilling time is up, preheat the oven to 425°F (220°C).
- When the chilling time has ended, remove the dish from the fridge and place a piece of parchment paper that has been crumpled up a few times into the pie crust. Gently push it into the corners so the entire bottom and sides are covered and fold it over the edges of the crust.
- Pour pie weights into the crust. Make sure they are evenly distributed and that they fill the corners. The weights should fill in up the sides of the crust so there is also pressure against the sides.
- Place the dish into the oven and bake for 20 minutes.
- When the baking time is up, remove the pie crust from the oven and place it on a cooling rack.
If you are par-baking the pie crust:
- Carefully lift the parchment from the corners to lift the pie weights (they will be HOT!) and carefully lower the parchment holding the weights into a bowl or a baking sheet.
- Add the pie filling to the crust and proceed with the pie recipe you are making. The crust does not need to be fully cooled before adding the filling and returning it to the oven.
If you are fully blind baking the pie crust:
- Carefully lift the parchment from the corners to lift the pie weights (they will be HOT!) and carefully lower the parchment holding the weights into a bowl or a baking sheet.
- Place a pie shield over the edges of the pie crust and bake for an additional 7 minutes.
- When the baking time is up, remove the dish from the oven and place it on a cooling rack. Remove the pie shield and allow it to fully cool before adding the pie filling.
Notes
- Please read all of the information tips, and FAQ info above, as well as the notes below before baking your pie crust.
- I tested this method with both my vegan pie crust and my vegan gluten-free pie crust. Use one of these or another recipe you prefer. If you use a different pie dough, keep a close eye on it while it bakes since it may take a few minutes longer or bake a little faster. This method is not meant for specialty pie crusts like those made from Oreo cookies, graham crackers, or pretzels, it's meant to be used for a crust made from flour and butter or shortening.
- If you are using a glass pie dish, please make sure that you are using one made from "borosilicate glass." This type of glass can withstand big temperature changes.
- Don't skip chilling the dough before baking it, this step is very important for the crust to bake properly and have the correct texture.
- If you aren't using a pie shield and you notice the edges of the crust browning too quickly, place a pie shield or foil over the edges to protect them from over-browning.
- When removing the pie weights from the crust, carefully lift the parchment from the corners to lift the pie weights (they will be HOT!) and carefully lower the parchment holding the weights into a bowl or a baking sheet.
- To make ahead and store or freeze: Allow the crust to fully cool in the dish (without the weights) and then carefully wrap the dish and crust in plastic wrap and foil (do it gently because the crust can break easily!). You can also freeze it for up to one month by wrapping the fully cooled crust (while it's still in the pie dish) in plastic wrap and then foil and placing it in a freezer bag or an airtight container. When you're ready to use the frozen crust, thaw it in the refrigerator overnight or at room temperature.
- Nutrition info is based on ⅛ of my vegan pie crust recipe made as written and with no filling. Nutrition info is only to be used as a rough guide. Click to learn how nutrition info is calculated on this website.
Nutrition
Serving: 1slice of crust | Calories: 183kcal | Carbohydrates: 19g | Protein: 2.4g | Fat: 12g | Saturated Fat: 6g | Sodium: 73.4mg | Sugar: 1.5g | Calcium: 0.4mg | Iron: 1.4mg